Wednesday, October 31, 2012

Mickey Mouse crocheted hat

Tonight I finished the crocheted Mickey Mouse hat I made for my great niece Payton for Christmas.  She turns 3 in January and just loves Mickey :) I hope she likes it.  You can find the original pattern HERE, but I did the ears and buttons differently and had to enlarge it for a 3-year old (the pattern goes up to 9 months).  Here's the pic of the one I made;

Shades of Safhire -Crocheted Mickey Mouse hat with revision

What I did with the ears is, I had these plastic cd-shaped disks (the kind that sit on top of a spindle of blank cd's or dvd's) that I'd kept thinking there would be a time they'd come in handy and they just did :)  I crocheted the ears with two sides and sewed the two sides together with the plastic disc inside to keep it rigid.  I also crocheted the white buttons instead of using real buttons to try to cut back on the potential of a choking hazard for little ones.
   I think it turned out pretty cute :)  That's one Christmas gift to check off :)

Tuesday, October 30, 2012

Frankenstorm aka Sandy & My updated Craft Projects Page Galleries

I hope all my friends and family and blog readers on the east coast of the U.S. are safe and warm as I type this!  I live in north east Ohio and the wind is howling and battering against the window so hard I can't sleep. I can't imagine what those of you closer to the coast are going through...

Well I forgot to take a sleep aid to help me sleep through all the noise outside (till just a minute ago), but I did get a lot accomplished on my blog tonight as a result.  I added Linky Tools to my blog and now if you visit my Craft Projects page, I have galleries of my crafts there to check out, if you'd like.  They will be growing as time goes on, no doubt, and I'll be adding more galleries for other categories such as recipes and other holiday crafts and whatnot.

Click HERE to go to my Craft Projects page and see my work :)

Again...stay safe and you're in my prayers!!!


Monday, October 29, 2012

Snowman Pot Holder and Pillow Face

I found this cute pattern for a snowman potholder on Pinterest HERE.
You have to buy the pattern but I decided to wing it and see if I could figure it out on my own.
It all started out ok till I realized it was becoming way bigger than a potholder :)  So after I made the first one (which I plan on finishing as a pillow!), I made another one which turned out the perfect size for a potlholder :)

I shared the picture on Facebook and asked around and people weren't crazy about the nose facing upwards, so I made the pot holder-sized potholder with a different face.  I plan to make a few more only make a cuter face.  However, I don't think I did too bad for winging it without a pattern :)

Shades of Safhire -crocheted snowman pot holder and pillow face


Thrifty Christmas Crafting - Ornament Wreaths

My pastor's wife messaged me on Facebook the other day and told me about a Goodwill near her (and about 15-20 minutes from me).  She said they had a lot of yarn "cheap". Broke Thrifty girl that I am, a few days later I headed over there after physical therapy with my husband and sure enough...SCORE (to be continued in another post).  I did get yarn, but I found a lot of other goodies too :) For now, this is only part of what I did with it:


Shades of Safhire - Ornament Wreath-large

It's difficult to tell in these pictures, but this one above is a large wreath made with average-sized bulbs. I will be trying to sell this one.

Shades of Safhire -Ornament Wreath small 
This one in the photo above is a small wreath made with really small bulbs. It was my first attempt and there are some imperfections that warrant keeping it for myself hehe :)


I followed directions similar to HERE
The hardest part was lining the ornaments up correctly, but my biggest bit of advice is do NOT skip the part about gluing the bulb hanger to the bulb. I learned that if you don't, when you are hanging the bulbs and they get close together, they WILL fall off and it isn't always easy to get them back on without knocking even more bulbs off :)

Friday, October 26, 2012

New Version of My Snowman Mug Hug

I had some time to kill in the waiting room of my husband's doctor's office today, so I took some yarn and supplies and made the majority of this new version of my snowman mug hug.  I made a different face and  I like this one much better than the first one I posted. It isn't the greatest picture (from my cell phone) and it isn't hooked onto a mug (like in the first picture of the first version), so the loops you see on the right are button loops (I have to sew the buttons on yet after I get some new white buttons for it).  I hope you like it!

(Inspired by the pattern HERE)

Snowman Mug Hug -version 2


Wednesday, October 24, 2012

A Few Blog Changes

I've been working on some new graphics and some new changes for my blog the past few days, so if things look a little strange the next few days, that's why :) Hopefully I'll get things straightened out very soon! Have a wonderful Wednesday everyone!!

Monday, October 22, 2012

Glass Pebble Chore Chart

As I posted in my last post, I'm seeking to find BALANCE in what I NEED to get done and what I WANT to do :) (Aren't we all?) :)  My current effort was found on Pinterest.  I made this chore chart using glass pebbles glued on magnets with a chore printed and glued in between the two.  I made a "to do" and "done" column for both my husband and I and put all the glass pebbles in a bowl and had him draw out half of them and those are his chores for the week and mine are the rest. Some of them are things that are hard work, some are very easy and simple, but need to be remembered too.  Looking at this chart, however, I told my husband we would start with getting it done in two weeks and when everything has been at least once, we can move it back to one week so the things that have been overlooked for too long could be just gone over again and wouldn't take as long.

Idea from HERE

Shades of Safhire - Glass Pebble Magnet Chore Chart

Ok, it isn't as pretty as I wanted it to be, but it serves its purpose.  At first, I made a pretty graphic and had put clear contact paper over it and had that covering the surface of the cookie sheet. BUT when I put the glass pebble magnet on it, it wouldn't stay! It kept sliding off, so I knew it wouldn't work any way but to have the magnet directly on the cookie sheet.  Maybe it's the "non-stick" feature of the cookie sheet, but the only way to even get the trim and column heading to stick was hot glue.  Maybe one day I'll figure out how to pretty it up better, but for now, it works.  Getting my husband to do his chores however...may be a much bigger chore in itself :)

(For the record, I have several of my glass pebbles moved to the "DONE" column since I took this picture!) :)

Sunday, October 21, 2012

House Cleaning and Crocheting

So this week I've been cleaning up a storm at home.  Besides the fact that I've gotten WAY behind on housework after starting physical therapy for spinal stenosis in my back, my family (my side) agreed we would have Thanksgiving at my house this year (first time in six years). Given my back and knee issues, I decided to start cleaning now so my house would look good for the holidays (and my family!).

I got a lot of cleaning done, and as I was hurting in the evenings, I couldn't spend the quality time in my craft room I would have liked to have.  I did get a lot of crocheting done though :)  I like that crocheting takes up so little room and you can do it while rocking and watching TV with the family in the evenings.

Here's what I got done this week with my crochet:


Snowman Mug Hugs (mug cozies)
(Pattern be found HERE)

Shades of Safhire - Snowman Mug Hugs (mug cozies)

A Christmas Stocking
(Pattern found HERE)

Shades of Safhire - Crocheted Christmas Stocking


And I started a snowman pot holder 
(I need to buy orange yarn to finish his nose yet)
Inspired by a Pinterest pin
I didn't buy the pattern, but figured it out myself.  I'm not sure I want to put the nose in the direction
she has hers though (I like it but I don't...can't decide  :)  )
(I need to fix the alignment of the right side too)

Shades of Safhire - Snowman Pot Holder (have to add the nose yet)

Oh, and I crocheted this last week and forgot to post it:
(I think the next one I make I will add a mustache.  I live in Ohio not far from Amish and I think this looks like an Amish Santa :) (they don't have mustaches after they get married...only beards)

Santa Coaster
(Pattern found HERE)

Shades of Safhire - Santa Coaster

I really have the itch to do some sewing this week and/or some wood work. I have some ideas for some Christmas signs I want to make from wood and paint them.

I'm on the search for BALANCE in my life :) I'm trying to not be so focused on just one thing to the neglect of others ;) I think I had a successful week with that, but I really long for more time in my craft room to do things other than crochet :)  We'll see how thing week goes :)

Saturday, October 13, 2012

Rotating Spice Rack Score

My family and I are regular shoppers at Sam's Club (no I don't work for them :) ).  So a few weeks ago, my son and I are in the food section shopping and as I turn a corner to go down the next aisle, the house goods department is right there next to us and I look over and catch a glimpse of this rotating spice rack. Memories of Pinterest and pinning links to my Craft Room/Zone board came back to mind and I remembered what a good idea I'd seen about using spice bottles for glitter shakers and for storing beads.  I meander over to 'just look" at it and noticed what a neat spice rack it is and it includes not only the spices in each bottle, but there's also a five-year free refill that comes with it and the whole thing is less than $20. You can't buy just the spices in the box alone for that price, let alone the spice rack too and definitely 5-years worth of spices! With the holidays (and my obsession with love of holiday baking coming up), I feel justified in buying it and I feel I got quite a score in the deal :)

Spice Rack Score from Sam's Club


So I buy the spice rack and bring it home.  I empty the contents of the containers into medication bottles and label it with duct tape (the first thing I could find), put the spices in my pantry and take the spice rack promptly to my craft room and fill the bottles up with glitter :)

Shades of Safhire -Repurposing a spice rack into a craft shaker rack

Shades of Safhire -Repurposing a spice rack into a craft shaker rack

It's PERFECT for glitter, beads, etc.  I plan to use the bottom row for beads after I empty the smaller amount of glitter I filled those bottles with.  It rotates and there's a choice of pour or sprinkle openings in the cap and also a removable cap with holes in it under the top cap. What a deal I got and what a thrifty gal I feel like today! :)

Sequin Christmas "Light bulb" Ornament and Tutorial

So I'm making these sequin "lightbulb" Christmas ornaments and I'm getting some decent feedback with them :)  So I decided to take some pics while I was crafting them today and share the how-to's in making them with my future blog friends in the form of a tutorial.  This is my second tutorial on my blog, so take it easy on me, ok? ;)

Ok, so here's the picture I took of several of them once they were done (ok, actually the pinkish one laying on its side isn't totally done as I ran out of the sequin string for that color, but it WILL be done once I get some more).

Shades of Safhire - Sequin Christmas "Light bulb" Ornament and  Tutorial

So buy a bag of egg-shaped styrofoam and a bag of small ball-shaped styrofoam shapes.


I bought a bag of this type, but haven't tried it yet, so I can't say one way or the other if it's better or worse than the above type:


For each ornament, you need one small ball foam shape and one egg foam shape:


These are the tools I found really useful to make these.  Tweezers and cuticle scisssors (which is a little-known crafty secret of scrapbookers and crafters and I recommend for small projects) and a stab and grab tool (to use as an awl to poke the hole in the top and adjust sequins that get out of line. Oh, and hot glue of course.

Get yourself some stringed sequins like this (I forgot to snap a pic of the sequins before they went on the ornament, so I grabbed these two from the web):

If you go to a craft store and buy it by the yard, you'll pay about 99 cents a yard.  I got some at Walmart, also, for 59 cents a yard (much cheaper!), but the colors are limited.  But if you can stop there and get the colors you CAN find there (if you can put up with the time you have to stand and wait for someone to come and take care of you) before you go to the craft or fabric store, you can save some money.

Next you'll need some thin silver ribbon. (Sorry the picture is a little blurry...it was taken with my cell phone camera as my regular camera needed charged back up).  You want ribbon that is silver that's 1/8-inch wide so that when you wind it around the end, it resembles the silver part of an old-time Christmas light bulb that screws down into the socket.

I picked up a bag of these to fill in areas I missed in overlapping my sequin string too. It's not a necessity, but comes in handy till you get the feel of working with the sequins and hot glue together.


Ok, the first thing you want to do is pick up your styrofoam egg and push down on it and kind of smush it into the table till you get a flattened bottom (make sure the big end is down and the narrow end up).

Make SURE you only hold it by its sides when smushing pushing down to flatten it.  Don't push on it from it's top or you won't get the  light-bulbish (is that a word...well now it is :) ) desired shaped. It will just look like a misshapen blob (trust me on this...I made the mistake of doing it on my first attempt!) :)

Having said that about the egg-shaped foam, now pull out the small ball-shaped foam and you CAN push down from the top to flatten this out on BOTH sides (top and bottom).

This is the desired shape you want for this one:


Take your handy dandy glue gun (which I still have yet to make friends with -I hate the strings..ugh) and glue the pieces together like thus (I took the picture of this before remembering to flatten out the bottom of the egg shape):


Once you've done that, you'll probably have a small gap where the two pieces meet. Fill that in with hot glue:

Now the pretty part begins :)  Take the end of your sequin string and begin gluing it on at the tip of the "bulb" (the egg shape). 

Just kind of swirl the string around till the tip is covered:


Then just start gluing the sequin string on winding and overlapping slightly as you go.  You want to overlap just slightly so you don't see white between the strings, but not so much that the sequins start to kind of stand on their sides (I did that on my first attempt...it's not very pretty, shiny sequin or not :) ):


Keep winding and gluing, winding and gluing...

 Till you've covered the entire "bulb" portion to here:

Once your sequin part is done, snip the end off and make sure the end is glued and looks good.  Then take out your "stab n grab" (sounds criminal, huh? :) ) tool (or a small awl or something pointy) and poke a hole in the middle of the top in the white flattened-out-ball part:


Get your ribbon you want to use as the loop to hang the ornament by and cut out a length about 6-7 inches or so:

 Tie the ends of the ribbon together (so the loop will be more secure when glued in there).  Then fill the
 hole about halfway with hot glue.  Use your tool of choice to push the knotted end of your ribbon loop into the hot glue in the hole:


Then add more hot glue till the ribbon is glued in there securely:

Next you'll want to glue small lengths of the silver ribbon across the top of the end piece.  What I did was apply one thread of hot glue through the loop and onto each side of it on the exposed foam and laid the ribbon onto the glue and then using the small cuticle scissors (sometimes also called mustache scissors or something...just small scissors that curve up at the end) and cut the ribbon at the area the foam starts to curve down:


I started out just cutting one-inch lengths and gluing those on, but quickly learned to cut after I'd  laid the ribbon on so as to save on ribbon


Once the top is nice and silvery, take your silver ribbon and glue and wind and glue and wind and...well you get the picture:


Till the whole white area is covered.  Snip the ribbon and tuck the end into the crevice gluing it between the portions:

And voila! A shiny, colorful "light bulb" ornament to hang on your Christmas tree :)

There are lots of colors to choose from depending on availability in your craft or fabric store (or Walmart, etc.):

Shades of Safhire - Sequin Christmas "Light bulb" Ornament and  Tutorial

I have to say, it takes a little practice to get the knack of working with the hot glue and sequin strings. The main thing I can suggest is that I learned that if I only squeeze the glue gun trigger about halfway and applied a very thin line of glue, it seemed to leave a lot less strings to clean up afterwards.  On other craft projects, to clean up the hot glue strings, you can just take a hair dryer and blow it on the strings and they kind of disappear, but not on this project (drats!).  The strings seem to be attracted to the sequins (who can blame them, I love colorful shiny things too!) and grab on with all their might.  So, if you can get a handle on the strings as you work, you're a lot better off when it comes clean up time :)  It just takes practice and getting a feel for how the glue responds to the sequins.

I hope this helps you make your Christmas tree prettier than ever this year!


Friday, October 12, 2012

Crafting the Past Few Days

I've been super busy this past few days crafting.  I made several more Christmas pillows and a crocheted Christmas stocking I put in my Etsy shop.

Here's the stocking I just finished:
Shades of Safhire -Crocheted Christmas Stocking with Holly and Ivy

I also crocheted the first of a set of Santa mug rugs (coasters).  I only have one made so far, so it won't go on Etsy till the others are done, but here is the picture of the first one:

Shades of Safhire -crocheted Santa mug rug (coaster)

I don't plan on doing a ton of Santa stuff, but this was a simple pattern and it only took me a few hours to do it.

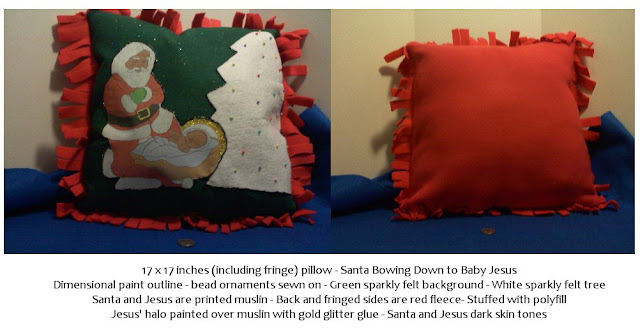
Here's a variety of Santa bowing down to baby Jesus pillows I made for Christmas and put in my Etsy shop (click to go to the correct page of my Etsy shop):


Shades of Safhire -Santa Bowing Down to Baby Jesus Christmas Pillow


Shades of Safhire -Santa Bowing Down to Baby Jesus Christmas Pillow

Shades of Safhire -Santa Bowing Down to Baby Jesus Christmas Pillow

Shades of Safhire -Santa Bowing Down to Baby Jesus Christmas Pillow

Shades of Safhire -Santa Bowing Down to Baby Jesus Christmas Pillow

Shades of Safhire -Santa Bowing Down to Baby Jesus Christmas Pillow

Shades of Safhire -Santa Bowing Down to Baby Jesus Christmas Pillow


I hope to move on to some new projects tomorrow, but it's nice to have several things in my Etsy shop finally :)

LinkWithin

Related Posts Plugin for WordPress, Blogger...
Find us on Google+