I'm staying up to date with my Project Life album pretty well so far. I just keep forgetting to put the pictures of it online for my Project Life Facebook groups and for my readers here :)
I added weeks 2 and 3 to the Project Life Blog Circle Page and you can view that (should you like to) here. Thanks!

Thursday, January 30, 2014

Wednesday, January 29, 2014
My Home-Made Valentine Card and Silhouette Cut File (Studio)
I've really been getting into my Silhouette Cameo lately and having fun with that :) I got and then a few months later got into couponing big time (see my coupon blog at www.calvarycouponers.com) and my Cameo slipped to the side, so I'm making up for lost time!
I'd like to share with you the Valentine's Day card I made for a Silhouette Challenge group on Facebook and also to give to my son's class.
First the picture and then the studio cut file First the picture and then the studio cut file (if you’d like it) for download.
I just made this card yesterday with my Silhouette Cameo cutting machine. It’s a wonderful machine that connects to your computer and along with its software helps you cut out shapes for card making, scrapbooking, lots of other project using vinyl and lots more if you’d like it for download.
I just made this card yesterday with my Silhouette Cameo cutting machine. It’s a wonderful machine that connects to your computer and along with its software helps you cut out shapes for card making, scrapbooking, lots of other project using vinyl and lots more.

I'd like to share with you the Valentine's Day card I made for a Silhouette Challenge group on Facebook and also to give to my son's class.
First the picture and then the studio cut file First the picture and then the studio cut file (if you’d like it) for download.
I just made this card yesterday with my Silhouette Cameo cutting machine. It’s a wonderful machine that connects to your computer and along with its software helps you cut out shapes for card making, scrapbooking, lots of other project using vinyl and lots more if you’d like it for download.
I just made this card yesterday with my Silhouette Cameo cutting machine. It’s a wonderful machine that connects to your computer and along with its software helps you cut out shapes for card making, scrapbooking, lots of other project using vinyl and lots more.
If you’d like to create something similar, here is your cut file including all the shapes you’ll need in one file:
Hmm...I don't remember how to add a downloadable zip or studio file to this Blogger blog, so for now, I'll just give you the link to the same post on my Wordpress blog to download it from if you'd like:
I started with a heart-shaped puzzle file. When I opened it up in Silhouette and tried to ungroup the “pieces” of the puzzle they broke apart in a many different portions of pieces, so I wound up reworking the file to make the pieces separate so you could cut them with scraps of different colors. Then I took all the different shapes I’d cut out and embossed them all with different patterns with my Big Kick embossing machine, then glued the pieces onto a piece of cardstock locking them into each other again.
My goal for this card is to give it to my son’s class (he is autistic) for Valentine’s Day. The symbol for autism awareness is a puzzle piece, so this was perfect. I did each piece a different color and pattern of embossing to reflect the autism spectrum: every autistic person is different. It’s a very broad spectrum! I also made it to submit to a Silhouette Challenge Facebook Group for the Valentine’s challenge they have going on and so I could share it with you, my blog readers (those of you who like crafting as well as saving money).
I wanted something 3-Dimensional on the inside so the kids would get a kick out of it, so I chose a pop-out heart file for the inside. I wish I could remember where I got it, but I believe it was a free download from another blogger (if you know who, let me know and I’ll give them full credit for that portion!). I used xmas red (I hate that spelling but that’s the brand’s name for this color) Stickle and crystal Stickle glitter glue to make the heart pop and to outline the front of the card’s scallops (it’s much more sparkly in person than in the picture). I also cut out a lacy heart (after I sized it right to fit over the autism puzzle heart) to fit under the autism heart on the front to make it look more like a valentine. I added a couple puzzle pieces to the inside to carry the puzzle piece theme into the inside, and I cut out the lettering and glued that on and I was done.
I haven’t made a card in a while, so I’m pleased it turned out this well. I’m happy and I think my son and his class will get a kick out of it when I tuck it in an envelope and include it with some cut-out heart-shaped cookies for his class on Valentine’s Day.
Thanks for looking!!
Thursday, January 2, 2014
My Project Life 2014 Blog Circle
I've never done a blog circle before, so this will be my first time :)
I've been a scrapbooker for...hmm...it feels like forever, but with more intention it's been since I got married in 2001. I have a bad habit of keeping up with it for a few months and then getting behind. I keep all my mementos and pictures all organized and ready to scrap, but then life happens and I fall behind again.
I started doing digital scrapbooking when my son came along in 2003. It was just easier that way so I didn't have to wrangle all the supplies and make sure the scissors were kept away from little fingers, glue, and whatnot. I did well with that the first year or so and then as I focused on being a new mommy (and then dealing with the autism diagnosis) I scrapbooked hit and skip and just wasn't consistent.
Last year I discovered Project Life and fell in love with it's simplicity. You can be as simple or as elaborate as you want, you can use pre-bought cards or download some from the internet, or (if you're a computer graphics junkie like me), you can make your own. I kept up with 2013 Project Life from January through April when life got busy with surgeries for both my son and my husband and just everything happening at once). I became a serious (not quite extreme, but I'm getting there...) couponer and took over a small Facebook group for couponers and built it up to over 13,000 members and then added another of the same size. Then I started my own coupon blog and that took up a big chunk of time till I didn't get back to my Project Life.
In 2014 I realized I need accountability if I wanted to start Project Life 2014 (and hopefully backtrack and catch up with 2013!). I discovered a great group of supportive, creative Project Lifers on Facebook and we created a little digital project life group where we have a little blog circle for 2014 to share our layouts and ideas with each other. This page is my contribution. Please make sure to click around the circle and check out all the amazing pages!
You've never heard of Project Life? Check out my blog post at CalvaryCouponers about it!
When you're finishing here, please remember to take a look at Melissa’s blog to see how she’s doing with her Project Life challenge!


I've been a scrapbooker for...hmm...it feels like forever, but with more intention it's been since I got married in 2001. I have a bad habit of keeping up with it for a few months and then getting behind. I keep all my mementos and pictures all organized and ready to scrap, but then life happens and I fall behind again.
I started doing digital scrapbooking when my son came along in 2003. It was just easier that way so I didn't have to wrangle all the supplies and make sure the scissors were kept away from little fingers, glue, and whatnot. I did well with that the first year or so and then as I focused on being a new mommy (and then dealing with the autism diagnosis) I scrapbooked hit and skip and just wasn't consistent.
Last year I discovered Project Life and fell in love with it's simplicity. You can be as simple or as elaborate as you want, you can use pre-bought cards or download some from the internet, or (if you're a computer graphics junkie like me), you can make your own. I kept up with 2013 Project Life from January through April when life got busy with surgeries for both my son and my husband and just everything happening at once). I became a serious (not quite extreme, but I'm getting there...) couponer and took over a small Facebook group for couponers and built it up to over 13,000 members and then added another of the same size. Then I started my own coupon blog and that took up a big chunk of time till I didn't get back to my Project Life.
In 2014 I realized I need accountability if I wanted to start Project Life 2014 (and hopefully backtrack and catch up with 2013!). I discovered a great group of supportive, creative Project Lifers on Facebook and we created a little digital project life group where we have a little blog circle for 2014 to share our layouts and ideas with each other. This page is my contribution. Please make sure to click around the circle and check out all the amazing pages!
You've never heard of Project Life? Check out my blog post at CalvaryCouponers about it!
When you're finishing here, please remember to take a look at Melissa’s blog to see how she’s doing with her Project Life challenge!
Title Page for 2014

The 2014 card was a printable as was the "we're all in this
together" (sorry, I forgot to take note of where I got those). The Celebrate
card is from We R Memory Keepers "Captured" journaling cards set, and the yellow
"photography and stories by" is from Becky Higgins Project Life's
Amber Core kit (I need to fill the info in there in the real paper version). Thanks for looking! Oh, the boy on the top is my
son, Evan (10 years old and autistic, so I have to take about 100 pictures to
get a really good ONE) , middle row is my husband Greg and our dog
Rudy. Bottom row is myself and Evan.
WEEK 1

Here is the picture of the real album pages with the week card made:
Middle row: January calendar card: printable from eleganceandenchantment.com, journaling cards from Becky Higgins Project Life Amber Core Kit, Keep Calm card is a printable (sorry, I've had it a while and didn't take note of where I got it at the time). Screenshot from my Fox8 news app about the weather, and another Becky Higgins Amber set journaling card.
Bottom row: Filler card on left: image saved from Facebook, weather image from Google (I added the "Winter Storm Hercules" and snowflakes to it), and far right is three screenshots from my Weatherbug phone app with some snowmen added at the bottom.
WEEK 2
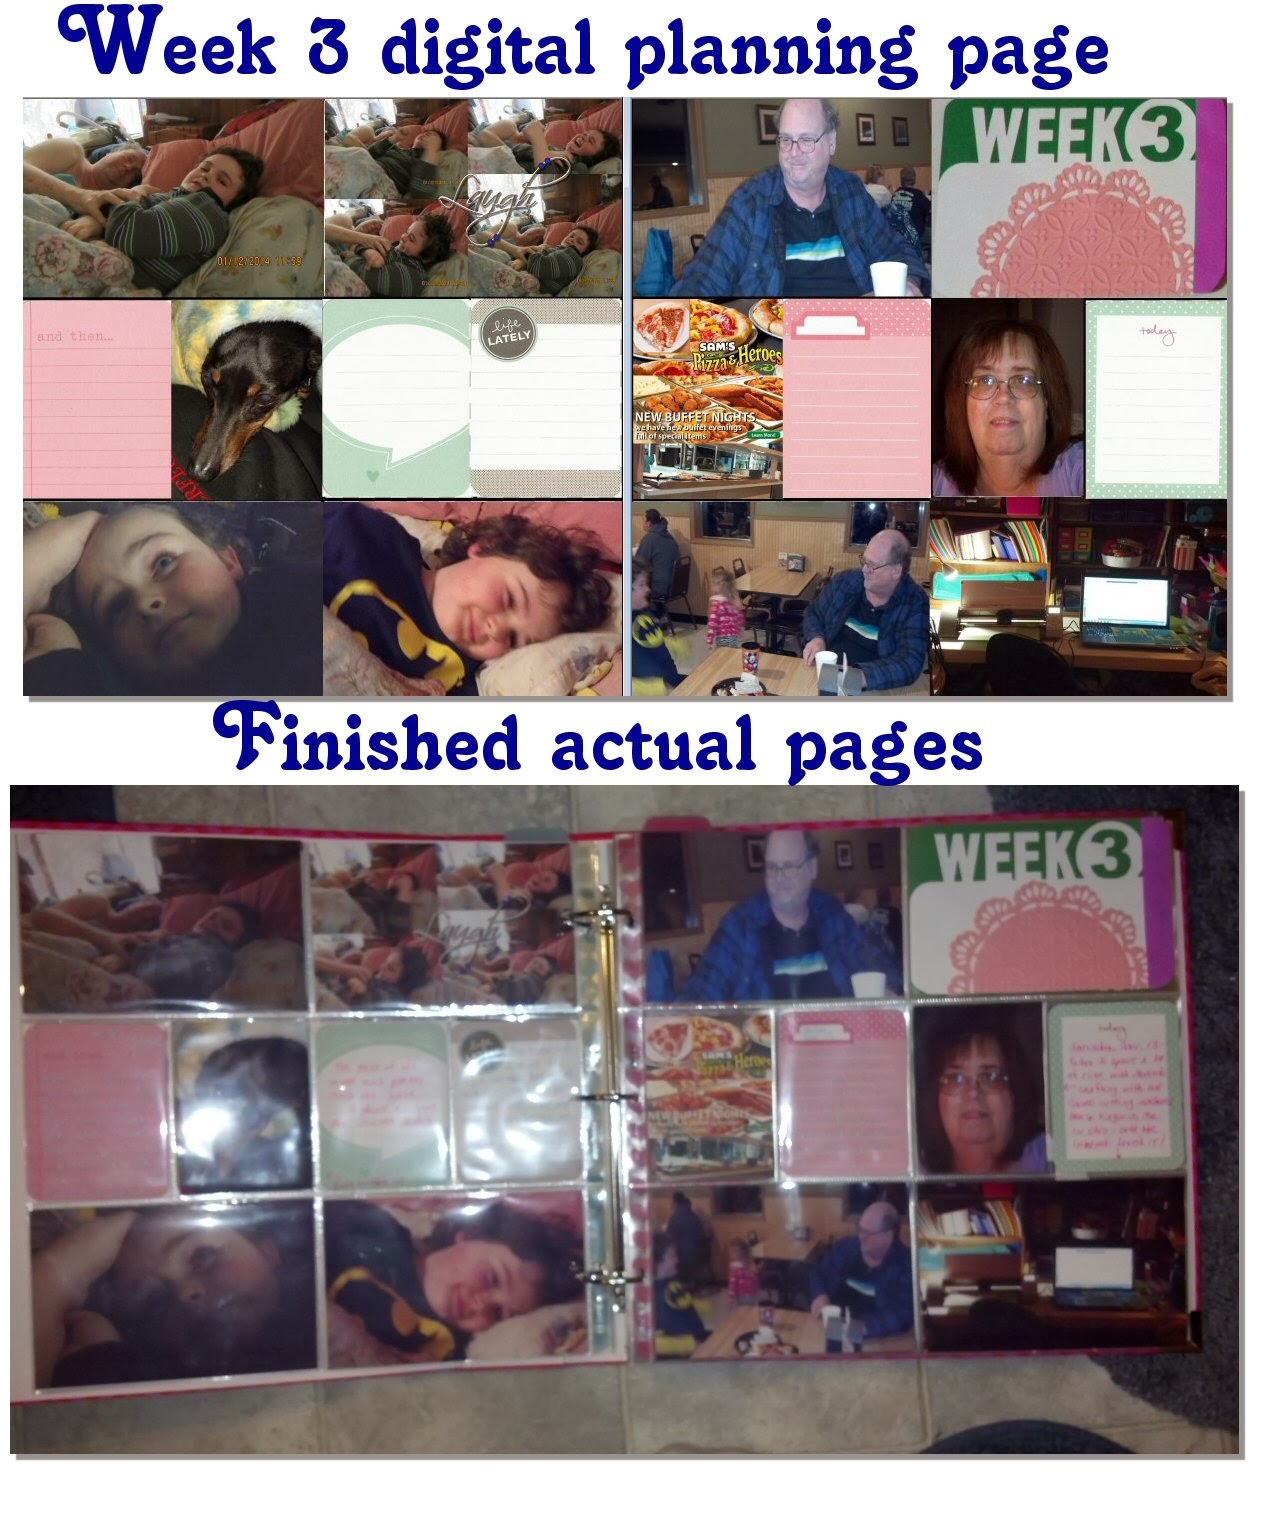
I plan my pages out on my computer, and as I've shared them, I realize that you can view them better in the planning version but you can see the, journaled, finished result in the real picture, so I'll start sharing them both together:
All the journaling cards but the "Snow day" card are from Becky Higgins core kit, Blush. the "Snow Day" card is a printable from the internet. I made the "week 2" card with my Silhouette Cameo and Big Kick embossing machine. I got the weather graphics from the internet and personalized them in my graphics program. The cartoon was from my Facebook news feed.
WEEK 3
When you're finishing here, please remember to take a look at Melissa’s blog
to see how she’s doing with her Project Life challenge!
New Year, New Blog Posts! - First Off is Project Life! Are Any of You Doing Project Life in 2014?
Hi everyone! I'm back and will be posting here at Shades of Safhire alongside my other blog, CalvaryCouponers.com.
Some of you may remember me posting last year about doing Project Life. I did it faithfully up till about April and life got in the way and I got behind. I think I can catch up using Project Life easily enough, I just won't be as detailed in my 2013 pages I catch up on, but I'm doing Project Life again this year! I hope to document it on both blogs.
Do any of you do Project Life??
Check out some great deals they have on Amazon for the Project life system! There are some core kits marked down, sales on new kits, and new things I didn't know was available yet ;)
Take a look at my blog post about it!
I look forward to getting more active here at Shades of Safhire now that CalvaryCouponers is fairly steady now :) I'd love to hear back from some of you!
God bless you in 2014 and always!
Some of you may remember me posting last year about doing Project Life. I did it faithfully up till about April and life got in the way and I got behind. I think I can catch up using Project Life easily enough, I just won't be as detailed in my 2013 pages I catch up on, but I'm doing Project Life again this year! I hope to document it on both blogs.
Do any of you do Project Life??
Check out some great deals they have on Amazon for the Project life system! There are some core kits marked down, sales on new kits, and new things I didn't know was available yet ;)
Take a look at my blog post about it!
I look forward to getting more active here at Shades of Safhire now that CalvaryCouponers is fairly steady now :) I'd love to hear back from some of you!
God bless you in 2014 and always!
Wednesday, November 13, 2013
Reminder to Follow Me at Calvary Couponers( AND I plan to be active here again very soon as well!)

Just a reminder to my followers here that I created and am maintaining a blog called Calvary Couponers at calvarycouponers.com. I'm doing a trial run for a few months of adding a crafting element to it, but whether it works there or not, I hope to be active here at Shades of Safhire soon alongside Calvary Couponers. I'd love for you to follow me there as well! I hope to pick back up here as soon as I get all the bugs worked out over there and get to where I'm mostly posting blogs and not working on the site itself.
I'm currently remodeling it to look similar to Shades of Safhire only in different colors and slightly different. Thanks :)
Oh, I'm about to add a Linky Followers widget there as well. I miss my Linky friends from here as well as my Google Friend Connect friends! (I so wish they hadn't discontinued that!...grrrr)
Thursday, August 29, 2013
Make Your Own Aloe Vera Gel!
Under the category of "Good to know!", you can make your own aloe vera gel!
 Thanks to CherylsDelights.com, we can now make our own aloe vera gel!
Aloe vera tel is great for treating sumburns, acne, elminating stretch marks, and fighting aging. Hello! where do I sign up? :) It's the perfect "all around, natural" cure (or at the very least, help).
Visit CherylsDelights.com to learn how!
What I've Been Up To
Hi everyone :) Wow do I miss my Shades of Safhire blog!
So what have I been up to ?
I started a new blog for couponing called Calvary Couponers. My hope when I first built the blog was to eventually link it to this and let the two complement one another once I got the new one established and running and wow is it running! It's taking so much time! There's NO shortage of content about couponing :) That new blog is Calvary Couponers (http://calvarycouponers.com/)
I'm starting to really get the itch to get back to my crafting (off the computer lol...I've been super busy at digital crafting...the blog :) ) and as each blog has an area for crafts and each blog has an area for tips, I plan to link the two together for those topics.
So, I hope to be posting much more often on this blog. I miss all my readers here and those who have messaged me and commented to my blog here.
Since I posted here, a number of things have happened. If you'll remember, I have one child, a 10 year old son with autism named Evan. Evan had a tonsillectomy and adenoidectomy back in May. We'd been putting it off as long as possible due to his lack of speech and not knowing if he would understand that he HAD to drink after surgery or he could dehydrate and have to stay in the hospital.
I'm proud to say, he did AMAZING :) I had a talk with him the night before surgery and told him it was definitely going to hurt for a while, but it wouldn't always hurt and that it was really important that he drinks after surgery or he would have to stay in the hospital. He kept very intent eye contact with me as I was telling him all about this and had a worried look on his face, but he seemed to understand. I was a nervous WRECK during the surgery until I saw him when we were called back. He had already drank something! He drank well in recovery and even had two popsicles before we went home. I'm so so proud of my little guy :)
Then about a month ago, my husband had another surgery. (If you've read my blog before, you may remember that my husband had a kidney transplant a few years ago.) He had to have a parathyroidectomy. Everyone has four parathyroid glands and normally they are the size of a grain of rice. His were many times bigger than that and it was making his calcium levels off the chart high. They removed 3 1/2 of his parathyroid glands and now his calcium level is where it should be.
I'm an administrator of 3 Facebook groups for couponing, once of which has grown so much I had to stop approving members for now and create another group.
I miss seeing all your updates and I hope to reconnect with you all !
God bless,
Helen :)
So what have I been up to ?
I started a new blog for couponing called Calvary Couponers. My hope when I first built the blog was to eventually link it to this and let the two complement one another once I got the new one established and running and wow is it running! It's taking so much time! There's NO shortage of content about couponing :) That new blog is Calvary Couponers (http://calvarycouponers.com/)
I'm starting to really get the itch to get back to my crafting (off the computer lol...I've been super busy at digital crafting...the blog :) ) and as each blog has an area for crafts and each blog has an area for tips, I plan to link the two together for those topics.
So, I hope to be posting much more often on this blog. I miss all my readers here and those who have messaged me and commented to my blog here.
Since I posted here, a number of things have happened. If you'll remember, I have one child, a 10 year old son with autism named Evan. Evan had a tonsillectomy and adenoidectomy back in May. We'd been putting it off as long as possible due to his lack of speech and not knowing if he would understand that he HAD to drink after surgery or he could dehydrate and have to stay in the hospital.
I'm proud to say, he did AMAZING :) I had a talk with him the night before surgery and told him it was definitely going to hurt for a while, but it wouldn't always hurt and that it was really important that he drinks after surgery or he would have to stay in the hospital. He kept very intent eye contact with me as I was telling him all about this and had a worried look on his face, but he seemed to understand. I was a nervous WRECK during the surgery until I saw him when we were called back. He had already drank something! He drank well in recovery and even had two popsicles before we went home. I'm so so proud of my little guy :)
Then about a month ago, my husband had another surgery. (If you've read my blog before, you may remember that my husband had a kidney transplant a few years ago.) He had to have a parathyroidectomy. Everyone has four parathyroid glands and normally they are the size of a grain of rice. His were many times bigger than that and it was making his calcium levels off the chart high. They removed 3 1/2 of his parathyroid glands and now his calcium level is where it should be.
I'm an administrator of 3 Facebook groups for couponing, once of which has grown so much I had to stop approving members for now and create another group.
I miss seeing all your updates and I hope to reconnect with you all !
God bless,
Helen :)
Saturday, July 13, 2013
My Couponing Blog
I just started building a new blog specifically for couponing and I hope to have Shades of Safhire complement that one and vice versa.
I hope to get back to being busy with Shades of Safhire once that's built and fully functional, so please don't give up on me! :)
Won't you click on over and show my new blog some blog love? :) Click on the picture to go to Calvary Couponers.
Thanks!!

I hope to get back to being busy with Shades of Safhire once that's built and fully functional, so please don't give up on me! :)
Won't you click on over and show my new blog some blog love? :) Click on the picture to go to Calvary Couponers.
Thanks!!
Monday, May 27, 2013
Today's Coupon Haul
Today's coupon haul. I got out for a bit alone today and was able to focus and did super well! I got everything in this picture. Before sales and coupons: $92.77 after sales and coupons: $39.19!! I saved $53.58!

4 Got2Be hair styling products. Normally $6.99 each, on sale for $3.99 each at Walgreens and I had 4 coupons for $2.00 off making each one $1.99 each instead of $6.99.
2 bags of Lays or Doritos chips on sale for 2 days for $1.99 each at Walgreens

4 Got2Be hair styling products. Normally $6.99 each, on sale for $3.99 each at Walgreens and I had 4 coupons for $2.00 off making each one $1.99 each instead of $6.99.
2 bags of Lays or Doritos chips on sale for 2 days for $1.99 each at Walgreens
Dove shampoo and conditioner 2 for $6. I had 2 $1 off
coupons dropping it to 2/$4. At Giant Eagle
Buehler's has Eckrich smoked sausge on sale BOGO (buy one,
get one). I had a 55 cents off 1 coupon and it doubled to $1.10, Its normally
$4.99 each, so two of them would have been $9.98 and I paid $3.89
Walgreens had paper towels on sale 2 for $1
Giant Eagle had Reynold's wrap on sale 2 for $6. I had
4 75 cents off coupons and Giant Eagle doubled each coupon making it $1.50 off
each one, so I got 2 for $3, so 4 rolls for $6 (and I forgot to look up the
normal price)
Walgreens had the Wet n Wild Fergie nail polish
un-advertised sale at $2.99 and I had a $1 off coupon making it $1.99
Giant Eagle had Ballpark Franks on sale for 2 for $4 and I
had one 75 cents off coupon which doubled to $1.50 making it 2 packs for $2.50
Giant Eagle had Sergeanto cheese on sale 2 for $5 and I had
one coupon (that expired today) for 50 cents which doubled to $1.00 off so I
got 2 packs for $4.
Saturday, May 18, 2013
In Need of Price Book Ideas!
So I'm getting my couponing under way pretty well, but there's one important aspect I have yet to tackle. A price book! Say I see something on sale at store A and something on sale at store B and the same item can be found at a low price store. How can I know which price is the best? Sometimes the low price store's every day price can be lower than the sale prices at store A or store B, sometimes store A or B has it for a steal with double coupons and sometimes store A does not double coupons, but will match competitor's prices.
How can I know which deal is the best if I don't track the costs at each store? Clearly I need to develop a price book. I've read various methods. Some people use good old fashioned notebook and write down the prices they paid as they go along. Some people use aps on their computers or smart phones and some people have completely different methods.
Ok, so I'm an old fashioned kinda girl in many respects, but I'm a tech-y kinda girl too, so the idea of keeping track of prices electronically through a spreadsheet of some sort is appealing to me. A bonus would be to have an app that you can use on your computer and smart phone both that syncs with each other.
Any ideas for me to try? I'd really appreciate any input! I have a number of receipts collected from shopping trips and need to get the prices in a price book of some kind soon.
Please comment!!
Thanks! :)
How can I know which deal is the best if I don't track the costs at each store? Clearly I need to develop a price book. I've read various methods. Some people use good old fashioned notebook and write down the prices they paid as they go along. Some people use aps on their computers or smart phones and some people have completely different methods.
Ok, so I'm an old fashioned kinda girl in many respects, but I'm a tech-y kinda girl too, so the idea of keeping track of prices electronically through a spreadsheet of some sort is appealing to me. A bonus would be to have an app that you can use on your computer and smart phone both that syncs with each other.
Any ideas for me to try? I'd really appreciate any input! I have a number of receipts collected from shopping trips and need to get the prices in a price book of some kind soon.
Please comment!!
Thanks! :)
My Couponing Binder
I did a lot of research on how to get coupons, how to organize coupons, and how to stack them, etc.


There are many different ways people organize their coupons. Some people file the inserts without clipping the coupons, some people clip their coupons and store them in boxes with dividers, some store them in accordian-style packets or boxes, and some (like me) use a coupon binder.
I'm a very visual person, so I want to be able to see at a glance by flipping pages what coupons I have. I think it would be too tedious to dig through multiple coupons in a box whether they are filed by category or not. Also, I plan to send my expired coupons to a group that collects them and then ships them to our troops overseas. The military can use manufacturers coupons up to 6 months after they are expired, so whatever coupons I don't use by their expiration dates will be sent over there to help out our troops (another post on that to come).
So I'm going to post pictures of the various parts of my coupon binder as I had a few questions from a few Facebook friends and this will help them and my blog readers as well. My system may change down the road but this is working great for me so far:

This is a picture of my binder. You can read more about it HERE on Amazon.
It's made by CASE IT and it's a dual 3-ring binder. The rings are "D" rings in 2 sections. I use the left side for food only coupons and the right side for non-food coupons.

At first glance, you'd think the rings were round, but as you can see in this picture, they are D-shaped:

Here is the packaging info:
I bought this one at OFFICE MAX because I wanted it right then, but I see it's about $5 cheaper on Amazon.
It has a small handle and also a long shoulder strap (which I LOVE). You can attach the shoulder strap or leave it off, it's up to you. It has one outer zipper pocket and I use this to put my bank card and/or cash and my driver's license in it while I'm in the store so I don't have to carry my purse with me and have that to tote with me as well.
Ok, next is the most important part of the binder. The baseball card pages!
I got these at Target. You can find them in that wall of trading cards and accessories that is located parallel to the checkouts. This is a pack of 35 and it costs about $4.99. Make sure you get these because if you go to the office or stationary area at somewhere like Walmart you're going to pay a lot more and the quality won't be as good (I got some a while back for a scrapbook album and so that's how I know). These are really sturdy and I haven't ripped one yet.
They are already 3-hole punched and fit in the binder (any binder) well.
What you'll do is put your coupons in the square areas normally used to put baseball cards in. I often have to fold many of mine to get them to fit, but that's not a problem. If you have to fold them and not see the expiration date, you can just flip the page over and see it from the opposite side.

So, here's how I have my binder set up from front to back:

This binder has lots of pockets and elastic and zippered sections. On the inside front I store envelopes I can use over and over with the names of the stores I frequent written on the fronts. I use these to store the coupons I intend to use at the designated stores so when I get to the store, I can pull out the envelope and access it in the store. I keep a pad of paper there for note too (just isn't in it in the picture...oops). The reason I take the whole binder into the store with me is that often you will come cross an un-advertised sale or see an item you want and you can check for coupons in your binder.
There's a zippered pouch I can store scissors, calculator, pen, etc in too.
Next I have a clear zippered plastic pocket page. Once I have the product in my cart, I put the coupon in this pocket, then when I'm ready to check out, the coupons I'm definitely using are all there ready to pull out and give to the cashier:

So what about the coupons you intended to use at the store, but once in the store you decide not to use it? Maybe the store was out of the item or you decided it was too expensive even with the coupon. I have a 3/4- high, clear pocket page I put those coupons in. I had to re-punch it so it fits the 3 rings, but that's not a problem. Then when I'm home and settled, I can refile those coupons.

These pages are really 8x8 scrapbook page protectors. They're the perfect size to use for this because they only go 3/4 or so in height and are easy to access quickly as you stuff the coupons in for temporary storage after I re-punch them to fit the 3-ring binder. Remember these because I have one more use for them a little later on!

Next is an info section. Anything you want to remember, you keep here. I have some information about shelf life and how much of what items are recommended for a stockpile:

Next is a page with information about (and the addresses for) how to collect expired coupons to send to our troops overseas. They can use manufacturers' coupons that are expired up to 6 months. For instance, I can mail mine to an organization in Indiana and they will in turn send them to a base overseas. More on that in an upcoming post. Then comes the all-important store policy section.

Use full-size plastic page protectors to store the coupon policies for your favorite stores here. This way you have it handy to refer to for yourself and also for a cashier who may be unaware of the policy of her own employer (it happens!) Different stores have different policies, so this helps you stay abreadst of what to expect. I'll provide links to the major chains in another post so you can just print them out.

The heart of the coupon binder. The coupons!!

You can organize it as you wish and use the categories that make the best sense to you. I will update this post to include the categories I use later today.
An essential part of the organization aspect is tabbed dividers so you can label the various categories. As you can see, I started out using just ordinary dividers, but they don't stick out to the side away from the baseball sheets so I plan on redoing the food side using these dividers once I get more.
I had these on hand at home and used them on the non-food side of my binder and they DO stick out farther than the baseball card sheets do. I'm told they can be found at Staples and I plan to get some more and switch my food side to those:

Here is how mine was packaged. I've had them awhile, so it may be packaged differently now:

I started out dividing my sections into two other sections. First the coupons that expire within a month followed by a section for coupons that expire after that. I STOPPED THIS. After a few trips to the store it became obvious that it was too confusing and tedious flipping back and forth :

So this is what I came up with instead. I removed the "expired later" divider and merged the like-categories together. This time I have all the coupons divided by months and separated by only one blank baseball card page:

Then as I'm browsing through coupons and come across the blank page, I'll know those coupons expire the following month. I do this in between all months I have coupons for and in each category (within the tabbed dividers).
For example: The category BAKING. The first pages will be the ones that expire in May. Then there's a blank page, then pages for coupons that expire in June, then a blank page, and so on. Each category gets this treatment. This way I'm not fumbling through coupons to try to find ones that aren't expired yet, and when the first section expires, I can just take those pages out, remove the coupons, and put the blank pages at the end awaiting the next month of coupons. They just keep rotating that way.

At the very end of the left-side (food section) rings I used my craft skills and made store coupon pockets. Remember those 8 x 8 scrapbook page protectors I mentioned earlier...the ones that go only about 3/4 of the way to the top? I used those here for store coupons:

I took a needle and thread and stitched up the middle separating the page protector into two pockets then used my label maker to label them. This worked out great :) You don't want to mix your store coupons with all your other coupons because you want to be able to locate them easily as most stores will take one store coupon and one manufacturer's coupon for one item. For example, you want to buy a package of toilet paper rolls. They cost $8. You have a manufacturer's coupon for $2. You also have a store coupon for $1. You can use them together to save $3 on that package of toilet paper. You can't use two manufacturer's coupons for one item, or two store coupons, but you can use one of each most places. So you don't want your store coupons mixed in with all your manufacturer's coupons.
That reminds me...you know when you receive your register receipt and they have those coupons that print either on the back of the receipt or on whole different tape? Those are called Catalinas. You can store the catalinas in these store coupon pockets too, as they are often good only at the store you get them from (not always, but usually).
Ok...one more thing, but an important thing!
This may change eventually, but for now, this is working well for me. All those store sales ads (at least at MY house) used to get laid around the house and I'd find them in the bathroom, kitchen...you name it.
I got a binder and put pockets inside and store my store ad in there. Then when they expire I can throw them away and replace it with the new one:
I got this particular binder at Walmart. I like it because it has an accordian file section on the outside front:

On the inside front cover is a pocket, and I store my notebook there where I take notes as I'm going through the sales ad (I need to learn all the couponing abbreviations so I can make shorter and better notes!)

I got these tabbed pocket dividers at Walmart too. I need to pick up a few more.


And there you have it. My coupon binder.
I'll be posting more as I go along, but this shows you the overall organization of my binder. Remember too, that I'm just starting out as a serious couponer, so I'll no doubt be adjusting things and making changes along the way. Check back for updates!
Couponing - My Beginning
Ok, so I've been wanting to coupon for years, but I just never made the effort to learn all about it and just do it (to be honest, I made an mild attempt a few years ago, but my husband's skepticism burst my bubble and I stopped before I really got started).
This time around, my interest was renewed after my friend Christy invited me to go to a couponing class in a neighboring city taught by Kelly, The Couponing Coach. Kellly was on the TLC show, "Extreme Couponing".
I left her class with 3 sets of coupon inserts, lots of information, and an itch to do more research online. I came home and began watching a number of couponing videos on YouTube and talking with a few old friends on Facebook and making a few new couponing friends on there as well.
I'm off to a pretty good start! Last night I saved more than 50% by shopping at a local grocery store that was running a triple coupon week (triple coupons up to 50 cents, so if you buy an item with a 50 cents off coupon, you save $1.50 on it, for example).
Here's my receipt from last night's trip:

The total before coupons was $100.36. I had 39 coupons and after coupons, the total came to $50.19. I matched a lot of my coupons with what was on sale in the sales ad, so when you add the coupon savings with the store's sale, I saved $68.59. On top of that, I earned 38 cents off each gallon of gas and we will get that one day this week, so whatever that savings comes to will be added as well!
The cashier was a young girl and was surprised as the numbers kept dropping as the coupons came off. She asked me, "Are you becoming an extreme couponer?". I took that as a compliment and said, "I'm learning to be! Well maybe not extreme, but at the edge of that" and laughed. The people in line behind me congratulated me on doing so well and it gave me a taste of what the people on Extreme Couponing must feel like :) (By the way, I'd never watched that show until I got started couponing and looked it up on our TV's digital guide). I know I'll never match the savings those people make, but I want to be as realistically "extreme" as I can be :)
I want to create a stock pile shelving area in our basement to have things on hand in case of emergency, but I don't see it becoming that huge, just a simple area with a few things prepared for a disaster, etc. Who knows :)
Here are a few other receipts from the past week or so:

This is the receipt from my first time couponing at CVS. I read a lot about how you can get great deals there, and I can see already that it's true. When you stack sale price with a manufacturer's coupon and learn how to do multiple transactions so you can roll earned Extra Care Bucks over to the second transaction and use them then to lower your second transaction you can really save! I need to learn a little more as it can seem a little complicated at first, but I can see how using loyalty cards at CVS, Rite Aid, and Walgreens can be really great when it comes to getting great deals!
This receipt doesn't show the price before coupons and extra care bucks, but this is the receipt from the second transaction. I only paid $14.82 and saved $24.17, so it was at around $39.00.

Finally, this receipt is from my first shopping trip to the store that was having the triple coupon week. The total before coupons was $51.67 but I only paid $22.60, saving $34.54.
What I've found really helpful is buying multiple copies of the Sunday newspaper so you have multiples of the coupons from the inserts. Then I organize the coupons in a binder and also print out coupons from online (more on that in another post to come). Then you watch the sales ads during the time before the coupons expire and when you see an item on sale you have a coupon for, you can buy multiples of the item and stock up on them (put freezable items in the freezer, stock items with long shelf lives, etc.) Also, if the item winds up being free or relatively low cost, if you don't want to "hoard" food, one thing I plan to do is to donate it to a local food pantry. It's a great way to be a giver when you don't normally have the extra money to give!
Next post: How I organize my coupons. My binder!!
P.S. Sure, I've used plenty a coupon in my day, so this isn't my first time using coupons. However, it's my first time making a concentrated effort at getting the very best bargains I can with multiple coupons and watching sales ads closely for products I have the coupons for.
This time around, my interest was renewed after my friend Christy invited me to go to a couponing class in a neighboring city taught by Kelly, The Couponing Coach. Kellly was on the TLC show, "Extreme Couponing".
I left her class with 3 sets of coupon inserts, lots of information, and an itch to do more research online. I came home and began watching a number of couponing videos on YouTube and talking with a few old friends on Facebook and making a few new couponing friends on there as well.
I'm off to a pretty good start! Last night I saved more than 50% by shopping at a local grocery store that was running a triple coupon week (triple coupons up to 50 cents, so if you buy an item with a 50 cents off coupon, you save $1.50 on it, for example).
Here's my receipt from last night's trip:
The total before coupons was $100.36. I had 39 coupons and after coupons, the total came to $50.19. I matched a lot of my coupons with what was on sale in the sales ad, so when you add the coupon savings with the store's sale, I saved $68.59. On top of that, I earned 38 cents off each gallon of gas and we will get that one day this week, so whatever that savings comes to will be added as well!
The cashier was a young girl and was surprised as the numbers kept dropping as the coupons came off. She asked me, "Are you becoming an extreme couponer?". I took that as a compliment and said, "I'm learning to be! Well maybe not extreme, but at the edge of that" and laughed. The people in line behind me congratulated me on doing so well and it gave me a taste of what the people on Extreme Couponing must feel like :) (By the way, I'd never watched that show until I got started couponing and looked it up on our TV's digital guide). I know I'll never match the savings those people make, but I want to be as realistically "extreme" as I can be :)
I want to create a stock pile shelving area in our basement to have things on hand in case of emergency, but I don't see it becoming that huge, just a simple area with a few things prepared for a disaster, etc. Who knows :)
Here are a few other receipts from the past week or so:
This is the receipt from my first time couponing at CVS. I read a lot about how you can get great deals there, and I can see already that it's true. When you stack sale price with a manufacturer's coupon and learn how to do multiple transactions so you can roll earned Extra Care Bucks over to the second transaction and use them then to lower your second transaction you can really save! I need to learn a little more as it can seem a little complicated at first, but I can see how using loyalty cards at CVS, Rite Aid, and Walgreens can be really great when it comes to getting great deals!
This receipt doesn't show the price before coupons and extra care bucks, but this is the receipt from the second transaction. I only paid $14.82 and saved $24.17, so it was at around $39.00.
Finally, this receipt is from my first shopping trip to the store that was having the triple coupon week. The total before coupons was $51.67 but I only paid $22.60, saving $34.54.
What I've found really helpful is buying multiple copies of the Sunday newspaper so you have multiples of the coupons from the inserts. Then I organize the coupons in a binder and also print out coupons from online (more on that in another post to come). Then you watch the sales ads during the time before the coupons expire and when you see an item on sale you have a coupon for, you can buy multiples of the item and stock up on them (put freezable items in the freezer, stock items with long shelf lives, etc.) Also, if the item winds up being free or relatively low cost, if you don't want to "hoard" food, one thing I plan to do is to donate it to a local food pantry. It's a great way to be a giver when you don't normally have the extra money to give!
Next post: How I organize my coupons. My binder!!
P.S. Sure, I've used plenty a coupon in my day, so this isn't my first time using coupons. However, it's my first time making a concentrated effort at getting the very best bargains I can with multiple coupons and watching sales ads closely for products I have the coupons for.
I'm Back!! (with new computer!)
Wow...I feel like it's been ages since I blogged!!
So like I posted from my phone ap, my computer started overheating and a friend of mine who is a computer whiz (he works for HP) told me that it would cost more to fix it than it was worth and he said I should just try to get a new computer. Money is incredibly tight for us, but I managed to work out a solution and after a ton of research (done mostly on the browser on my cell phone...good thing I have unlimited data!) I decided on a Toshiba Satellite computer and I had it custom made from the Toshiba Direct web site. It took few weeks of waiting before I got it, but cutting out the middle man saved me money and made sure that I got just what I wanted on it. It arrived yesterday and so far I love it (the jury is still out on Windows 8, but I'm trying to adjust to it). There are a few settings I need to figure out how to adjust, but otherwise I'm loving it. When I scroll vertically it doesn't respond like I'd like it to, but I know there's a setting to adjust, I just have to figure out how to do it. I went to the hardware section of the control panel and played around with mouse settings, but it didn't fix it. Gotta figure that out before it drives me crazy.
Anyway...it has 8 gigs of RAM (upgradeable to 16 which it seems like I'm definitely going to want to do before too long), and a terrabite hard drive. The processor is an Intel I-7 and it has a 17.3 inch screen which I love. That also ensures the keyboard is nice and wide too, with a full number pad.
So...I'm all set to get back to blogging and whatnot. I still have quite a bit of software to reinstall on it, but I have all my pictures and most of the things in my documents section copied over, so I'm going to be busy doing that all weekend for sure.
I've been online this whole time while I was waiting for my new computer to be built and shipped, and before hand during the decision phase, but it was on my cell phone which is pretty limiting. I got on my husband's desk top computer a few times, but his chair kills my back, so those moments were few and short-lived.
Lately what I've been getting into is COUPONING! I'll definitely be adding that to my blogging as it goes right along with my efforts to be more of a Proverbs 31 woman and I already have a section called Penny Pinching I have yet to enter anything into, but that won't be for long.
If you're reading this, thank you for sticking with me during my absence!
Now on to a new post about my couponing :)
So like I posted from my phone ap, my computer started overheating and a friend of mine who is a computer whiz (he works for HP) told me that it would cost more to fix it than it was worth and he said I should just try to get a new computer. Money is incredibly tight for us, but I managed to work out a solution and after a ton of research (done mostly on the browser on my cell phone...good thing I have unlimited data!) I decided on a Toshiba Satellite computer and I had it custom made from the Toshiba Direct web site. It took few weeks of waiting before I got it, but cutting out the middle man saved me money and made sure that I got just what I wanted on it. It arrived yesterday and so far I love it (the jury is still out on Windows 8, but I'm trying to adjust to it). There are a few settings I need to figure out how to adjust, but otherwise I'm loving it. When I scroll vertically it doesn't respond like I'd like it to, but I know there's a setting to adjust, I just have to figure out how to do it. I went to the hardware section of the control panel and played around with mouse settings, but it didn't fix it. Gotta figure that out before it drives me crazy.
Anyway...it has 8 gigs of RAM (upgradeable to 16 which it seems like I'm definitely going to want to do before too long), and a terrabite hard drive. The processor is an Intel I-7 and it has a 17.3 inch screen which I love. That also ensures the keyboard is nice and wide too, with a full number pad.
So...I'm all set to get back to blogging and whatnot. I still have quite a bit of software to reinstall on it, but I have all my pictures and most of the things in my documents section copied over, so I'm going to be busy doing that all weekend for sure.
I've been online this whole time while I was waiting for my new computer to be built and shipped, and before hand during the decision phase, but it was on my cell phone which is pretty limiting. I got on my husband's desk top computer a few times, but his chair kills my back, so those moments were few and short-lived.
Lately what I've been getting into is COUPONING! I'll definitely be adding that to my blogging as it goes right along with my efforts to be more of a Proverbs 31 woman and I already have a section called Penny Pinching I have yet to enter anything into, but that won't be for long.
If you're reading this, thank you for sticking with me during my absence!
Now on to a new post about my couponing :)
Tuesday, May 7, 2013
New Computer Ordered
Well after my computer started overheating like mad, I broke down and ordered a new one from Toshiba Online. Its due to ship by May 13th, so I should be active in blogging again in a few weeks. I hope everyone is well and blessed! TTY soon :)
Wednesday, April 24, 2013
Computer is Overheating
I promise I haven't forgotten about my blog. My computer has been overheating and I've been backing up files before it burns up for good! I'm posting this from my smart phone with a Blogger ap. I will be back to the land of bloggers when I am able to get a new computer. Say a prayer for me and don't give up on me! :)
Thursday, March 14, 2013
Glass Pebble Nightlight Tutorial
So I've had this pinned on Pinterest for a while and decided to tackle it. Here is the Pinterest pic:

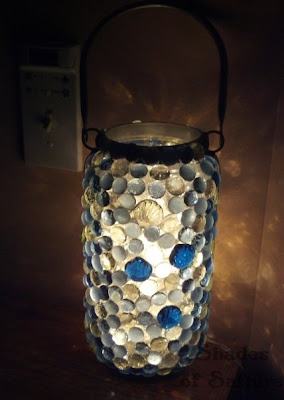






You can see that HERE, but when you click on the link, it takes you to a page with a ton of other pics and I couldn't find this one, so I don't know where the original post is from.
Here is my rendition of it:

I used a LOT of glass pebbles and 2/3 of them really were blue, but the blue didn't show up as well as I'd hoped when I lit it up. There were also only 6 bigger dark blue pebbles. It gets the job done, though :) I hope to make another one using all dark blue pebbles of varying sizes with only a few clear ones in hopes of getting a more blue affect than this. I like it, I just would love a bluer one ;)
So lets get started:
So I was browsing around Big Lots for a nice glass bottle or something to use for this project when I came upon this beauty. What makes it so nice is that it is actually a tea candle holder and the bottom is removable so you can change out the tea light. I decided to go with this because it would save me from having to get a diamond drill bit to drill into the glass with. I could just remove the bottom. I also had a 20% off coupon. Score! :)

In the same trip to Big Lots (and with the same 20% off coupon for the entire purchase), I also found the glass pebbles. This bag of pebbles was $5, so I wound up paying $4 for it. I picked up the Aleen's Glass and Bead Adhesive at Joann Fabric store (in the area where they sell all kinds of adhesives). It's important to use glass adhesive and not hot glue because hot glue will just come apart in no time. I can't tell you the number of craft things I've gotten as gifts that were gorgeous when I received them, but they were done with hot glue and in no time I was having to re-glue the items that were glued with that stuff. Glass needs to be glued with glass adhesive :)

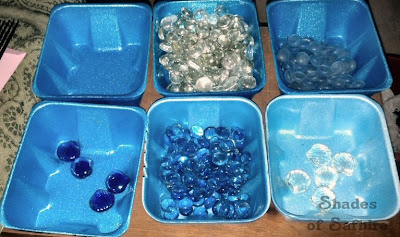
The first thing I did was sort the different colored pebbles so I could vary them as I was applying them to the candle holder:

Then just start glueing the pebbles onto the glass in whatever arrangement you desire. One thing I found out is not to use TOO much glue or the pebble would slide all over the place. The directions say "small amount" and I guess they know what they're talking about :) Follow the directions on the glue as it tells you to apply the glue to both surfaces you plan on adhering together then wait a few minutes and then put them together and press and hold.
This was the hardest part of the whole project. The more pebbles you adhered, the heavier the project got and the pebbles would make each other slide all over the place. For ME with the type of glass candle holder I used, what worked best was starting at the sides where the metal part goes down the sides of the "jar" (for lack of a better word). I could glue the pebble on right next to the metal bar and the pebble rested against the metal bar. Then work my way away from the metal bar gluing pebbles next to the one I'd just glued on as the metal bar kept the pebble from sliding any farther. (I hope that makes sense lol).

Apply the pebbles to half the glass and after the pebbles seem like they have stopped trying to slide around, you can leave it laying on it's side for 24 hours while the glue hardens and cures.
(See...I actually have at least 2/3 of the surface covered with BLUE! You just can only see the DARK blue as being blue when it's lit up). I wish I'd have realized this before they were all glued on. But like I said...I think I'll be tackling this again with mostly dark blue pebbles this time :)

When you have half the pebbles glued on and it has sat for 24 hours, roll it over onto the pebbled- side and do the other side and let that set for 24 hours as well.
If you don't have a glass container like I did that has an opening in the bottom, you'll have to drill a hole in the bottom of the side of the container big enough to fit your Christmas lights in. I've never done that before, but from all I've read, you probably need a diamond bit for your drill to do that. I took the lazy way out lol
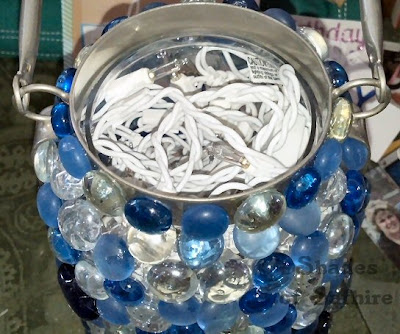
Instead of buying new lights, I just went into my Christmas stash and pulled out this box of lights that I'd never opened. I'm a colored-lights kind of girl at Christmas, so I don't use many clear/white lights, so I'd never opened this box. In fact, I'd bought this on clearance at a drug store not long before I'd gotten married intending to use it to decorate the church altar for the wedding, but we never got to it in the decorating process.

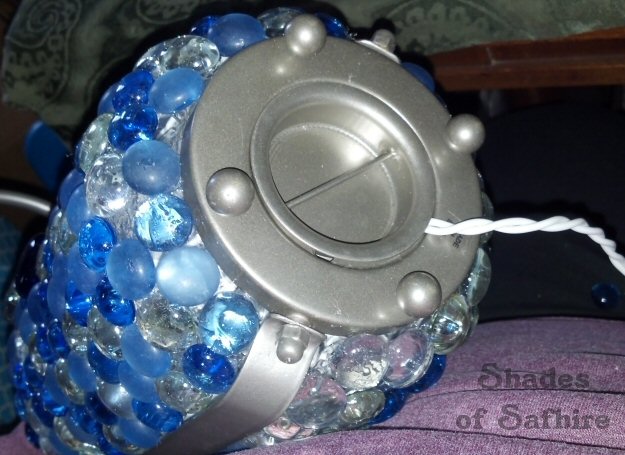
Here you can see the bottom of the container I was talking about. The bottom just unscrews for the original intention of changing out the tea light. It was pretty cool :) I thought I'd have to alter in in some way so it would still be able to screw back on and still hold the core without pinching it, but it screwed back on loosely and didn't pinch the cord at all. (Again...check out ALL THAT BLUE!...that didn't show up in the dark) :)

I just stuffed the lights in there and pulled the male end of the cord out the bottom. I didn't put anything over the top as I thought it might already be a little hot and thought leaving the top open would keep it from getting overly hot.

And there you have it :) My new night light for our hallway between the bedrooms and bathrooms.
I look forward to my next trip to Big Lots to buy another glass candle holder and then go to Hobby Lobby where I've seen nice DARK blue pebbles hehe. But that's for another post :)
One thing that attracted me to this project was the way the original picture showed the pebbles reflecting onto the wall around it. Mine is reflecting some, but I think the dark blue might reflect better. (Ok, so you know by now that I LOVE blue! hehe)

Happy night light creating :)
Subscribe to:
Posts (Atom)
LinkWithin
