Saturday, January 19, 2013

It was such a busy week!

I got a few emails from a few of you asking if I was ok :) Aawww...that was so kind of you!! :)
I'm still here! It's just been SUCH a busy week I haven't had time to update my blog. I think things have calmed down a bit, so hopefully I can get back on track.

We had a SUPER important appointment we've been gathering paperwork and filling out forms and whatnot for weeks now:


Ugh...I HATE paperwork, don't you??  Well I should say I hate my OWN paperwork. I'm ok doing paperwork when I was a secretary, but my own financial paperwork makes me a nervous wreck. As you can see from my messy dining room (apart from all the papers!) I am badly in need of some home organization time and motivation too :)

Oh, and on the way to the appointment while we were still on the highway doing about 50-55 mph, this happened! :


My husband was driving and managed to keep the car under control.  We have a front-wheel drive car and it was a rear tire that blew, so that helped, but we had to hobble around till we found a tire place to get a new tire put on (as my husband procrastinated and didn't get the spare fixed forgot to fix the spare which was also flat).  We finally got a new tire and though they didn't have a brand new tire at the time to fit our car, they did have a really good used one (looks pretty close to new to me!) which they gave us installed and all for $31, including tax.  Score :)  The good Lord was certainly watching over us that day.  We did make it to our important appointment before hobbling to the tire store and I am just AMAZED the rim didn't get bent at all (my stubborn husband kept driving on it...ugh).  But it all worked out great by the end of the day.

I have Pinterest on my phone, so I've been pinning here and there when my husband is driving or I'm waiting for him when we're out and about, so if you follow me on Pinterest, you probably saw a ton of pins from me :)

Today I went on strike lol.  I spent a good bit of time in my craft room getting to know my new Silhouette Cameo cutting machine better and making some die cuts and cards for my Project Life scrapbook.  I'll post some pics from that as soon as I fix one of the pictures that's not aligned the way I want it to be.

I hope you all had a great week!!!

Monday, January 14, 2013

Lighthouse Window Done and Delivered!

I finally got the lighthouse window finished and delivered to my friend last night.  She had given me the window and the paints around Thanksgiving but then my husband got sick and was in the hospital for a week and all sorts of other things came up (Christmas being one of them) and I just finally got it done.  Here is the finished product:


I never claimed to be an artist mind, you (I wish!) and especially as it was my very first time painting with glass paint, this was quite a challenge for me.  The glass paint is really thin and the colors are deceiving.  I'd paint on a layer of light blue and it would dry dark blue. A finished color of black when on light grey.  I could go on and on :)  I had to blend so many colors to get what I thought the final result would be and then it would dry completely differently and I'd have to touch up (and usually scrape it off and start again) many times.

What I finally wound up doing was making sure that all the paint that was actually touching the glass was the glass paint (so it would stick well) and then going over it with some acrylic and glass paint blend.   Also, I painted white caps in the water, but it dried blending in with the blue apparently...  it was SO CONFUSING.

So anyway...my hope was that the glass paint being stuck to the glass and then the acrylic going on to the glass paint would all stick together well enough and not scrape off.  (I told my friend to tack on a piece of white cardboard or poster board to the bad side so nobody could accidentally scrape any paint off just to be on the safe side).

I used my new Silhouette Cameo to cut out the black text from black vinyl and applied that to the GOOD side (the side you see and the opposite side from the side I painted on).  It was the first time I'd used my Cameo other than a few test runs with cardstock, so it was nice that that turned out so well.  I learned a lesson with that in that IF I ever paint on glass again and someone wants text overtop of it, to PUT THE TEXT ON FIRST :)  That way I can put a ruler on the other side of the glass to line it up better when I apply the letters. THEN paint it.  (Live and learn, right? )

This is an in-process picture.  See how I painted the white caps?


(This is the bad side...the side I painted on).  White caps with lots of light blue painted in with the darker blue to make the water look kind of stormy.  Well you can see from the finished picture above, it did not dry that way. It turned out all blue (ok...we all know blue is my absolute favorite color, but come on...).  I made sure the white was touching the window too, and not just painted overtop as you wouldn't see it from the other side if it wasn't touching the glass.  Apparently it dried transparent or something.  Weird..  This was huge lesson in painting on glass with glass paint for me. I have lots to learn if I attempt this again! :)


See the "black" lighthouse top when the paint was wet?:


Grey :)


And the bottom of the lighthouse that's made from light brown bricks separated by dark brown lines?

Wet Paint.  Two distinct colors:


Dried Paint.  Same color:


The browns were a lot MORE uniform before I painted a coat of light brown acrylic over them on the opposite side which brought some dimension out.

The two colors of brown were "Cocoa" and "Root Beer Frost".  You'd guess the Root Beer Frost would be the light brown right (Frost...)?  Nope...it was the dark brown.  The cocoa was the light brown (though both dried dark...ugh).  I don't get it!

And due to the weird brown colors issue, what's supposed to be rocks around the lighthouse looks more like sand (my husband said..."Oh that sand looks good!"  Sand? Arghh...

But...I guess with all the tinkering around I did with the acrylic paints and whatnot, people seem to like it :) I just wish the colors had been true to their names and the way the packaging made them look like they would be when dry and I hadn't had to tinker with mixing in acrylics to get the proper color.  Then it would have been a pretty translucent paint.  I will say however, that I really like the way the sky turned out. 

I also like the way the text looks sitting on TOP of the glass and how it casts a shadow onto the painted area below it. That was a happy accident :)


I'm glad the project is finally done and finally delivered to my sweet, patient friend who seems happy with it :)  I'm glad also, that I did tackle something new. I love learning and working through unexpected things that come up to try to solve a problem (with creative things anyway) to create a work around.  Thanks for helping me try something new, Wilma!

On to the next project and getting to know my Cameo better too!


Friday, January 11, 2013

Cutting Vinyl Text with Silhouette Cameo

So I got the Silhouette Cameo electronic cutting machine for Christmas.  There's been so much going on that I just got to unpack it the other day!

Anyway, I have this project I'm working on for a friend from church.  She brought me this window she wanted me to paint a lighthouse scene on (with glass paint which I'd never used before) with the words of the chorus to the gospel song, "The Lighthouse".  I was totally intimidated as I'd never painted on glass before. Ok...well never INTENTIONALLY painted on glass before :)  But I've been giving it my best shot.

After I got painting it, I knew there was no way I could paint the text on it with that thin (kind of watery) glass paint and have it look halfway decent, so I decided to paint the scene on the backside, and use my handy dandy new Cameo to cut the text out of black vinyl and attach it to the front of the window (which totally rocks because it casts a neat shadow onto the scene on the other side of the window glass!)

Anyhoo...I watch a few videos on how to use the Cameo and do a little research and I get busy unpacking the machine and getting it all set up.  That part was no problem. However, I'd never come across a video on how to cut text out of vinyl before so after a handful of rookie mistakes, I finally got it right and thought I'd post a tutorial here for other rookies so that maybe I can save them a few gray hairs that I got in the process :)  So here we go:

The first thing you need to do is create the text you want to use in the software (I have the designer edition so I hope all of this is the same in the standard edition).  Click on the text tool on the left (where I drew the red arrow below):


Don't choose a font that's really skinny or you'll just cause yourself some real headaches if you're still in the rookie phase, like me :)  This font is Ariel size 72. Now that I look at it, I realize I didn't use bold. That may have helped :)  Initially, I tried to copy and paste the text from a Word document into the Silhouette Studio software, but that didn't work (at least not for me...maybe there's a way to do it after I get more familiar, but I just typed it into the software all over again for the time being).

Next you want to change your settings and your blade depth so the blade cuts through the vinyl correctly. 

Next click on the "Page Tools Window" icon in the upper right hand corner.  It's the red square within a black square.  I circled it in red below:


Choose the width of your vinyl (I was using a sheet of 12 x 24, but only cutting within the 12 x 12 area, so I chose 12 x 12.

Then choose (and this is really important because it's where I screwed up the first time and was ready to pull my hair out because I couldn't figure out why my vinyl was sliding all over the place in the cutter!):  At the bottom is a "Cutting Mat" selection window.  Choose NONE.  (When you cut a full sheet of vinyl you won't use your cutting mat.  This I did learn from a video somewhere. If you have scraps, you can use those on the cutting mat later).  So...rookie mistake #1 for me corrected :)

Next click on the "SILHOUETTE CUT SETTINGS" icon in the upper right immediately to the left of the previous place you clicked.  This time it's a pencil you will click on. Again, I circled it in red below:


In the first window, scroll down and click on "Vinyl Silhouette Brand" (ok, I used Cricut brand, but only because I found it easily at Walmart while we were there shopping for groceries).  

For the cutting speed and thickness and blade setting, I referred to this chart I found on Pinterest:

And I discovered what they have listed there for vinyl is the same thing the Silhouette Cut Settings window said to use as well (I have to do things the hard way at times lol).  But it's a nice chart to keep on hand when you're trying to figure out settings for other mediums as well.  The pin linked to Classy Clutter but when I went there to try to find the actual link to share here, I couldn't find it.

Ok...back to cutting our vinyl text!

Make sure you have your blade set to 2 (and make sure you clamp the blade back down again unlike I did the first and second times!!) :)  Ugh :)

Once you have your settings adjusted and your vinyl loaded (WITHOUT THE MAT), you can click on the CUT button  on the bottom (where I...yep..you guessed it...circled it in red).

If you're still confused, check out Expressions Vinyl Blog for a little extra info (at least it helped me)

Once your vinyl is loaded correctly and your settings are adjusted, click that CUT button and let her rip (not literally, we hope!)

Once your cutting is done, unload your vinyl and you should see something similar to this:


Now here's what REALLY helped me and believe it or not, I didn't see a tutorial or read any info on it, but it just kind of dawned on me when I realized what this big roll of tape was that came with my vinyl kit  I got with my Cameo (and remembered reading something in passing in a Pinterest pin about using freezer paper for transfer tape.  TRANSFER TAPE...aha! So THAT's what that stuff is :)
  I forgot to take a picture of it, but mine looks like this picture which I borrowed from the web site of WM Plastics Inc. after doing a Google image search:


   You COULD just peel the letter off one letter at a time (like I did for the first few letters before realizing it's not as easy to line it up and get it to stick in just the right place as it seems), but just save yourself the frustration (and tons of time) and use the transfer tape method. 
  Here's what ya do:
  Cut off a piece of the transfer tape about the size of 2-3 words or so.  Lay the tape (sticky side down) over the text that's been cut in the vinyl. (See the picture below).  Press it down over the vinyl text really well so it picks up the letters that have been cut out (concentrating on the dots for the "i", etc.)  Then slowly pull the transfer tape away and you should have the black vinyl letters now "transferred" to the "transfer" tape (I'm such a clever girl..heh...)


You don't have to use the cutting mat with a big piece of vinyl because the vinyl is sticking to a backing already and the vinyl letters pull away from the backing which doesn't get cut.

You will be left with letters on the transfer tape like so:


Sorry the words are different. I was taking pictures along the way so I could share the information with a friend and some pictures turned out better than others as I was working and taking pictures at the same time...

Your letters are now on the transfer tape.  Pull out the project you want to apply the letters to (in my case a window I'd painted on the other side of).  Line up the text overtop the surface you want to apply it to and stick the transfer tape with the letters onto the surface (again, sticky side down):


At this point I realized what I will do next time IF I ever do a painted glass project with text again.  Do the lettering FIRST, so I can put a ruler on the other side of the glass in order to line the text up better.  Live and learn, right? :)  

I forgot to take a picture of this, but your vinyl should come with a flat stick (like a tongue depressor) or you may have a tool that comes with a cutting kit that has a flat end (mine is a pair of tweezers that has a flat rounded end on the other end).  Take that stick or tool and rub over the letters to ensure they stick to the surface you want them to remain on.  Once they're on well, slowly peel away the transfer tape leaving the vinyl letters on the surface (in my case, glass):


Do it slowly as you'll want to carefully make sure the vinyl letters don't peel away with the transfer tape.  What I found is that rounded edges stayed on pretty well, but skinny things (like the letter I above) tended to want to pull off. Oh..and the dot in the letter i will try to pull away about half the time, so make sure you watch out for that.  You'll be left with something like this:


Next you'll need to use a pair of tweezers or something sharp like that (I started out with my fingernail...not a good idea...it tended to wrinkle the text I wanted to leave on the window) and remove the center of letters like the A's and the D in the picture above.


Then move on to the next set of words until you're done.  Here's how mine turned out:


Not bad for my first project, I think.  Again, next time the letters go on FIRST so I can use a ruler or straight edge on the other side to apply the words a little more straight.

That's it :)  I'll share more info on the window I painted once it's done.  I have to do some touch up and then I have to paint the window frame itself next.  I know normally you'd probably want to paint the frame first and then put the vinyl letters on and THEN paint your scene on the other side of the glass, but I was waiting on my friend to get back to me on what color she wanted me to paint the frame and I decided to get busy with the rest of it while I waited to hear back from her.

I learned a lot from this project.  Happy lettering!


Monday, January 7, 2013

One Word - My One Word for 2013

   I've been seeing posts from others about choosing and claiming ONE WORD to be your goal for yourself for 2013.  In honor of my first attempt at Project Life (and for something to create as I await my kit in the mail) I created this graphic to go on my first page of my album.
   I didn't have to think at all for what my word would be.  My word is BALANCE.
   I've always been an "All-or-Nothing" kinda girl and that's messed me up more times than I can count. If I could get my life in balance, it would be so much better!  If I could balance my interests, responsibilities, eating, spiritual life, online time, crafting (you name it!) I could be so much more productive and fulfilled, I think.
   So I guess you could call this my first freebie I'm sharing :)  This is a 4 x 6 printable that fits perfectly in the Project Life page protectors.  Feel free to use it, if you'd like. I just ask that you don't sell it or claim it as your own :) Just right click the image to save it.


   Once I begin my album (after it arrives), I plan to choose one day of the week to share my layouts and to focus on Project Life.  I hope to make some Project Life friends along the way as well!

Friday, January 4, 2013

Some of My Digital Scrapbooking Layouts

These are just a handful of my digital scrapbooking layouts I've done over the years. Ones I could find easily enough already saved in thumbnail form anyway :)  There are some that has a woman with her face smeared over. That's my sister. She didn't want her picture shared on Facebook at the time (where I shared the layouts of the images with her picture smeared out), but her face is still intact on the real full-size (12 x 12 300 dpi) layouts.

Some of the layouts have graphics collected here and there on the internet and a few digi scrapping yahoo groups that I used to be in (and which used to be active but have died out since then) (Sorry I lost track of who created the ones I didn't. Like I said, it's been years that I was collecting them).  However, quite a few of the graphics I created myself too.

This one of my son is my very favorite ever.  I made the template and the papers myself:


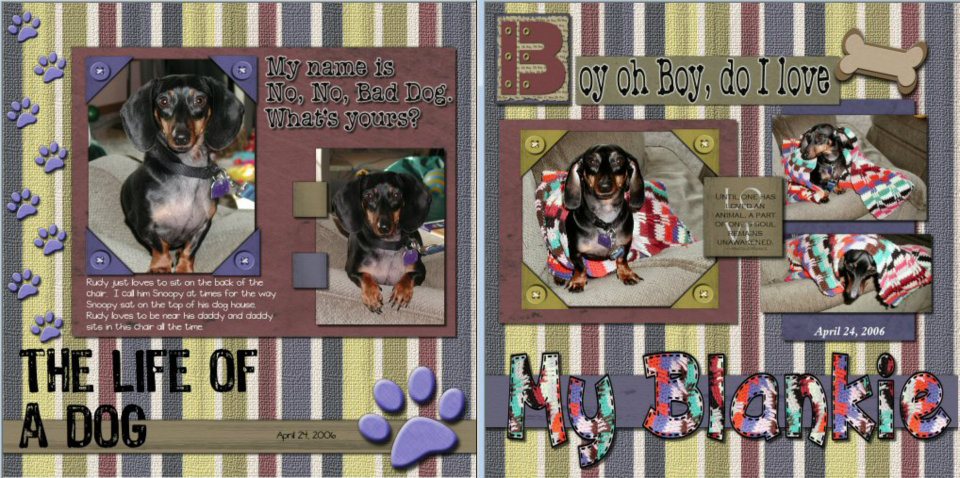
This is a layout of our dog, Rudy:


A Mother's Day layout:

A mini-vacation while searching for family history information:

8 screenshot thumbnails of Heritage layouts:

My mom's birthday


Some layouts for my recovery album that never got finished (see...told ya!) :) (I found these on TwoPeasinaBucket.com I'd posted in 2007):

More of my mom's birthday:


My son and his little basketball hoop:


I'm one of those mommies who just loves pictures of her little boy asleep ;)

My son and his cousin at Chuck e cheese

My husband's baptism:

My son's dedication:

My son and his swimming pool :)

A lazy Memorial Day:

My husband's aunt and uncle's 50th anniversary party:

My son and his Tickle Me Elmo and everyone else's reaction:

My family:

More Chuck e cheese:


Again, these are only a few of my digital layouts :) I have many of my layouts printed out and put into albums, but I have many that aren't printed out yet.  I have a wide-format printer that prints the 12 x 12 layouts, but it sure goes through the ink! (Which is why I haven't printed them out in a long time!)  I may look into getting the rest put into photo books.

So anyway...that gives you an idea of my passion for digital scrapbooking.  I love it, but I'm a little anal it can be so time consuming that I get really behind in my memory keeping. That's where I hope Project Life will come into play in 2013.  Wish me luck :)


Project Life and more in 2013

   Ok gang, I just committed to doing Project Life this year for 2013. I love scrapbooking and over the years I've become quite the digital scrapbooker. But I'm way way behind! I've been contemplating doing Project Life for the past 6-7 months or so now, but have been holding off till the start of the new year to begin in January.
   Do any of you do Project Life?  I'd LOVE to hear your experience with it! I'm going with the Amber set.
   Don't know what Project Life is?  Well I have Becky Higgins' handy dandy YouTube video to share with those of you who don't :)
 

And here is one by someone who has done Project Life and explains it thoroughly:


So what is an avid digital scrapbooker doing with Project Life?  Ok well here's my plan :)

With Project Life you can have things ready to go and just put them in the slots along with your pictures. The journaling cards already done makes it's a much faster process. I'm super anal with my digital scrapbooking and it makes me tend to take way too long to get things scrapped, HOWEVER, I really LOVE the creative process of designing layouts with my own designs and whatnot, so I plan to incorporate the speed of Project Life with an occasional digital layout here and there along with it (maybe in the same binder, maybe in a different one, I haven't thought that far ahead yet). That way I'm more likely to get an entire year scrapped instead of a file of pictures I intend to digitally scrap but isn't done yet. (I got married in 2001 and that album STILL is not done!)

AND....since I got my brand new handy dandy Silhouette Cameo, I can design some of my own journaling cards, etc. digitally, print them out and cut them out with my Cameo as well.  But if I don't follow through on the crafting of a lot of my own cards, I'll have the Project Life cards to keep me up to speed  :)

I hope to be really creative and crafty this year including posting some of my own digital scrapbooking layouts and elements to share (and possibly sell depending on how things go) as well.  I've been doing digital scrapbooking since I was pregnant with my son in 2002 and I love working with computer graphics.

In my next post, perhaps I'll share some links to some of the layouts I've done (if I can remember where I have them online...TwoPeas I believe.)

-------------------------

Since the holidays, I've been super busy rummaging through paperwork and filling out forms to take to a very important meeting on January 15th as well as working on painting a lighthouse scene on a window (a real glass window) for a friend from church.. (I'll post pics of that process once it's done...I've been super nervous about that as I've never painted on glass before!)  

Tomorrow (er...later today as I see it's well after midnight now... Yikes!) I will be spending the majority of the day un-decking the halls :) As much as I LOVE Christmas, this one was particularly rough for my family and I and I'm eager to get back to some normalcy.  My son goes back to school on Monday and my women's Bible study group reconvenes on Monday night, so my hope is to have all the Christmas stuff taken down and put away and all the papers gathered and filled out by Monday.  I want to get my craft room straightened up and work on getting things better organized at home as well. I'm sure you'll be hearing about that along the way.  Oh, and my husband has the outpatient procedure to remove that nasty kidney stone on Friday too. I'll be glad when that whole saga is behind us!

Have a great weekend! Oh, and if you live anywhere the northern part of the US, stay warm!! (It was 7 degrees here the past two nights! Ouch!) :)

LinkWithin

Related Posts Plugin for WordPress, Blogger...
Find us on Google+