Sunday, September 30, 2012

Been Productive!

I've been productive crafting these past several days (except today...very sleepy day..ugh). I'll post the pics when I have them at a point where I'm finished with a few things.  I was SO sleepy all day today for some reason. I even kept falling asleep in church...yikes!

I go tomorrow to have injections in my knees called synvisc.  It's a medication made from rooster combs. I won't get much crafting done tomorrow either, but watch out Tuesday! My craft room is beckoning! :)


Have a great Monday, everyone!!

Tuesday, September 25, 2012

Hubby is Home

By the way, my husband is home from the hospital and doing well now.  Whew! That was too close for comfort!

Hubby is Home from the Hospital

Thanks for your prayers!

This Week's Craft Projects

I'm all set to get crafting!  Here are this week's projects:

SANTA AND BABY JESUS FELT & FLEECE PILLOWS

I got the idea from the cover of this magazine:
Better Home and Gardens Holiday Crafts magazine 2012

I plan to make a few of those too, but then I got the idea to make the same pillow only using the pattern I created for some yard art I made last year:
Santa Bowing down to Baby Jesus yard art

So I already had the graphic on my computer, so I opened up my graphics program and shrunk the pattern for Santa bowing down to Baby Jesus to fit onto a 16 x 16-inch pillow.  I got the felt in the colors I need and I used my graphics program to "dissect" (if you will) the various colors in the image and have those printed out and ready to cut the pieces out in felt and piece them together to make a pillow top.  I got some red fleece in the remnant section of the craft store and will use that as the back of the pillow instead of felt (I think it will be more comfy), but otherwise use the same techniques in the instructions for the snowman pillow the magazine gives. I'm planning to start on this when I get up tomorrow morning, so wish me luck! :)

SEQUIN LIGHT BULB ORNAMENTS

This is a second project I have the supplies to do and I think it's just so pretty.  I'm like a cat when it comes to shiny things :)

Sequinned Light Bulb Ornament

I'm making this in Christmas Red, Kelly Green, Royal Blue (of course ;) ), Gold, and ...hmm...either purple of fuchsia.  I have the supplies to make about 2 of each color.


NO SEW FLEECE PET BLANKET (or throw for a human) :)

Here's my fleece fabric:

Doggy Patterned Fleece for No-Sew Blanket

It will have one pattern on one side and the other on the other side and the finished product will be like this (only in my patterns):

(This image borrowed from HERE)


I'll be a busy girl this week!

Saturday, September 22, 2012

Candy Toast

  I'm sitting here thinking about my brother, Danny.  He was killed last year in an industrial accident at work. One of the last times I went to his house with my family, he surprised me by making something he and my sister Bev and I enjoyed growing up.  Candy Toast.  My mom used to make it for us when we were kids.  I very very rarely have it anymore and my husband thinks it's weird :)
   Basically, candy toast is just chocolate peanut butter fudge poured over toast while it's still hot and you can eat it hot or let it set up and eat it cold.  The toast kind of cuts back on the sugary-ness of the fudge and compliments it well.  I know, it sounds weird if you haven't grown up on it like we have, but it's very yummy :)  It was a really special thing for him to do for me because it told me that he had fond memories of something from childhood he shared with me and wanted to re-create it for me.  That speaks love to me.  I miss you, Danny! :(

 Anyway...I thought I would share the recipe here for you. The fudge part is the recipe that used to be on the side of the old Hershey's cocoa boxes (those tin or aluminum brown boxes that holds baking cocoa).  Here it is:


CANDY TOAST

2/3 cup cocoa
3 cups sugar
1/8 tsp. salt
1 cup milk
1/2 cup water
1/4 cup peanut butter
1 tbsp. vanilla

Stir cocoa, sugar, salt, milk, and water in a saucepan.  Bring to a bubbly boil stirring constantly.  When on a hard boil, wait till a drop of the fudge mixture stays in a soft ball when dropped in cold water (or test with a candy thermometer and take it to the Soft Ball stage).  Remove from heat and add peanut butter and vanilla. Stir till mixed and either pour into buttered pie pans or over dry toast.


I looked for a picture from the web to share with this recipe, but couldn't find one.  I guess I'm just going to have to make a batch to share pictures from it.  Sigh...if I HAVE to...hehe :)  Only for my blog's sake of course ;)

UPDATE:
   I just remembered I have pictures from that night.  Here's my brother Danny making the candy toast:

My brother Danny making candy toast 
My brother Danny making candy toast

My brother Danny making candy toast


Here it is ready to eat. Yum!  I guess this means I don't have to make it to take pictures to share.  Darn :)
Chocolate Candy Toast!

Danny and I shortly afterwards. It was the 4th of July, 2007 and we were waiting for the fireworks to begin. 

My brother Danny and I.  July 2007

My cutie pie son, Evan (4 years old at the time) about to try his first bite of candy toast :) (I'll find any excuse to show a picture of my baby boy hehe)

Cutie Pie Evan July 2007


If you try it, you'll like it! :)


Shout Out to Marie at Code It Pretty.com

A big shout out to Marie from Code It Pretty.com for giving me pointers to give my background images on the right a transparent background :) She has a lot of great pointers over at her site and I encourage you to check it out if you're starting a blog!  Thanks, Marie! :)

Thursday, September 20, 2012

Prayer Request for My Husband

   I just got home with my son after taking my husband to the hospital with a blood sugar reading of over 600 (the glucometer stops at 600). They transported him to a different hospital to admit him to put him on an IV insulin drip.  He had a kidney transplant last year and is on a lot of medication including anti-rejection medication that drives your blood sugar up.  It wreaks havoc with his blood sugar..ugh.
   I would have stayed with him, but my 9-year old son (who is also autistic) was with me and they wouldn't let him into the ICU anyway.  So we came home to get some rest and I'm trying to get my son to wind down now and get some more sleep and I jumped on here while letting him watch a little TV to help him wind down a little and hopefully get sleepy.
   Anyway...would you please keep my  husband, Greg, in your prayers?
  One thing I think is responsible is that he had a cortisone shot in his knee yesterday morning and that's a steroid which is bad for blood sugar as well. I knew that after having had them in my own knees.  The orthopedic surgeon he saw never even told him that could happen.
   I don't know if anyone reads this blog yet other than three friends of mine, but for anyone who reads this, would you please pray for him?  Thanks!!

UPDATE:  Greg was kept overnight and till early evening the next day and was allowed to come home on the condition he checks his blood sugar levels 4 times a day instead of 3 and increases his injections of insulin. He's tired, but his blood sugar is down to the mid 200's.  Still high, but not deadly high like it was. Thanks for any prayers that went up for him from anyone who read this :)  It was just ONE MORE THING...know what I mean??  arghhh :)

Wednesday, September 19, 2012

SO Close!

I'm SO CLOSE to being happy with the way my blog looks :)  If I could JUST get those images in my sidebars over there ---> to be centered in their section and not sliding off to the right into the sunset of cyberspace, I'd be super happy.

UPDATE:  Never mind! :)  After getting some sleep and looking at it again, I 
decided to take all my buttons and change them to have a drop shadow so
it would look like they were popping up out of the page (as opposed to sliding
off into the sunset) :)  Having changed the gadget background to a light blue to
blend into the background image and shadowing the buttons, I'm happy now :)

The other thing I'd love is to be able to make the background behind my "Let's Buddy Up" graphic transparent!

UPDATE:  I still want to figure that out yet, but later tonight I plan on putting a shadow
around that too, so it pops out like the buttons do.

Oh, and I need to center my header graphic, but Photobucket wasn't cooperating with my image tonight, so I'll try again tomorrow.

UPDATE:  Something else I will do when I get back online tonight.  Both this and
the "Lets Buddy Up" graphic have to be made into image maps (after I add
the shadow to the Lets Buddy Up graphic-the header already has one) so
they take a little longer to do and I'm going to log off and and GET CRAFTING
after I edit this post! Yay!!

I got a lot done today, however, and since I changed the sidebar gadget background to light blue, it looks better.

I posted asking for help at several blog tutorial sites and I think I'm just going to sit back for now and wait to see if someone replies.  I'm burned out doing Google searches and digging around and playing with html codes and whatnot.  I want to be back to the business of crafting something other than MY BLOG :)

It's almost time to try to promote it, but I've been holding off till I get it "just so" :)  My friend Morado called me a bull dog :)  That I just keep going and going till I accomplish what I set out to do.  I think that's a good thing! Sometimes... ;)

I'm off to pay some attention to my much-neglected Pinterest boards for a bit and then slide into the sheets. My brain is telling me it's in overload and needs to rest too!

Have a great Wednesday everyone! (If anyone is reading this blog yet anyway hehe).

Tuesday, September 18, 2012

Blog help needed! arghhhh :)

Arghh. I want to get this silly blog set up and ready to go already! I want to get back to the business of crafting :)  This part is making me crazy!

I need to have some sections of my side bar with an image but transparent around the image, and leave some sections with their background colors.  Any help would be HUGELY appreciated! :)

Here's what I'm having trouble with:

I need blog help! :) I need to move my images I embedded in sidebar gadgets to the center.  Not the gadget itself, just the images.  They're sliding off to the right..ugh

Monday, September 17, 2012

Just the Way You Are!

This met me in my Facebook news feed as I was about to log off and thought I'd share it here. I'm sure I'm not the only one out there who needs this reminder :)

Just the Way You Are

Gonna try to get some rest now. 

ZZZZzzzzzzzzz.....

Helen

Sick and Still Plodding Along with My Blog Design

   Well Evan definitely has strep.  How do I know?  Because he was a considerate little boy and shared it with his mommy (how thoughtful of him! :)  ) Now I have it too! I started feeling sick with a sore, scratchy throat last night, coughing a dry barking cough, feeling woozy and listless, and just plain icky.  Given my husband's weakened immune system after his kidney transplant last year, I can't be too careful; so I went to the local hospital's ER (it was Sunday and my doctor was closed) to get checked out and sure enough...strep.  I got a big OUCHY shot in the keester.

So...here I am in the bedroom ever since then so I can keep my distance from my husband till it's been 24 hours since the shot and then I'm not contagious anymore.  I'm sucking on Everlasting Gobstoppers (hard candy) nonstop to help keep my throat moist and slightly less sore.  Just when I think my throat isn't as sore anymore, it kicks in again and proves me wrong.  I just feel...well...there's that "word" again:  icky.

While I'm confined to my bedroom (which isn't so bad as my computer is in here, a 36" TV and the master bathroom) when I'm not laying down resting, I'm on here trying to get my blog straightened out.  What a challenge!  I switched to a different template night before last.  The first one just wasn't setting right to me. I wasn't sure what it was that was bothering me about the first one till I got going with this one, but now I know.  It was too much green for a blog called "Shades of Safhire" :)  So this one has spaces between the modules so you can see the blue background.  Now I'm trying to fix everything that didn't align right in the move to the new template.  Like the images in the sidebars (to the right). The images are sliding off to the right. I've been scouring the web trying to figure out how to center them! Sigh...it will have to wait till I get some more rest. I'm wiped.

Have a blessed Monday, everyone,

Helen

Saturday, September 15, 2012

Tinkering with my template

If you look at my blog and it looks a little wonky, it's because I'm tinkering around with a new template. So what you will see probably is not the finished look! :)

Thanks ;)
Helen

Perfect Doxie Pic for today!

   Ok, one more post because this is heritage-related :)
  My friend Julie sent me this picture on Facebook.  She knows I have mini doxie (dachshund) named Rudy and how much I love doxies.  But I don't think she knew how much more meaning this picture would have to me :)

Doxies with crocheted scarves asking "Is Grandma Gone Yet?"

  My sister and I had to wear dresses when we were little (the whole both grandpas being a preacher thing) and we'd be outside playing in our shorts and see grandma and grandpa driving up the road and we'd hightail it to the house to put our dresses on! :)


   So how perfect is this image for me? LOL  Thanks Julie Gantt!! I love it :)

  Oh...and not to mention that they have CROCHETED scarves on! SOO cute :)

Outtie,
Helen


Stubborn Sick Boy

So we take my son Evan (who is 9 and autistic) to the walk-in clinic.  He's been sick the past several days with a runny nose and sneezing and just seems to be feeling icky (I don't know if he has a store throat or not since he doesn't talk and seems to be eating things that you'd think would hurt to swallow if you had a sore throat).  His classmate's mom called me last night and told me her son has strep.

I go into a bit of panic mode because my husband just had a kidney transplant last year and is on anti-rejection medication and is more susceptible to getting sick than he used to be (compromised immune system). So my husband slept on the twin bed in my craft room in the basement last night while I sat up with Evan (sleeping next to me while I worked on this blog) so he wouldn't be breathing in anything Evan may have last night.

Anyway...so we take him to the walk-in clinic (because of course it has to be a weekend when his doctor is closed). They wanted to do a strep swab on him to test him for strep.  The little booger would NOT open his mouth to be swabbed.  So they call in for reinforcements a nurse to come in and help hold him down.  That didn't work.  So they called in the doctor who sat and held Evan down.  With FOUR of us holding him down, he wasn't going anywhere, but that didn't stop him from crying and clamping down his jaw like a vice grip. Arghh. The little booger :)

So after four grown adults give up trying to get in that little mouth, the doctor wound up just writing him a prescription for anti-biotics just in case.  He told me it's normallly a 10-day treatment and to only give hi 5-days worth unless he still seems sick after that, then give him the rest of the doses. So he MAY have strep and may not and my husband gets to sleep in my craft room again tonight till Evan has been on the antibiotics for 24 hours to be on the safe side.

This autism mommy and wife of a transplant husband is not easy, let me tell ya! :)

Back to working out the rest of the blog bugs. Have a great day everyone!!

Helen

Friday, September 14, 2012

Rudy makes me take a break!

My dog Rudy decided to plop down and lay his head down on my keyboard and take a nap :)  Maybe he's telling me to take a break from all the staring at codes and graphics and websites and blogs and google searches and pay some attention to him! :)


My Doxie, Rudy, laying his head on my laptop

He may be right :)  I've been working on the graphic, codes, and image map for my social networking icon box (on the right side) all afternoon and just got it fixed a little while ago.

This blog creation stuff is addicting and fun, but my brain is getting fried :) I'm looking forward to getting all the bugs worked out and the bells and whistles in operating order so I can get to the business of regular posts and crafting!  Oh, and promoting my site so there's someone here to read it. That might help :)

Off to play with my puppy :)

Helen

Thursday, September 13, 2012

The Definition of "Beautiful" Does Not Require the Word "Skinny"


I'm a big girl. Have been all my life.  I don't apologize for it. It's who I am.  I'm from a family of big people and my dad was bigger than me at my highest weight.  I'm a LOT smaller than I was at my highest weight and you can read about that HERE,
but I stand by the picture in this sign!

The Definition of "Beautiful" Does Not Require the Word "Skinny"

Chocolate Gravy


CHOCOLATE GRAVY OVER BISCUITS

I just added this to my "Recipes" page and wanted to share it here in a post as well:


Chocolate Gravy


I grew up (as I shared in "About Me") in a family where mom was born and raised in SW Virginia up in the hollers of the mountains.  She grew up in the late 30's and 40's when times were tough and the mountain folks were getting by on very simple meals but were creative in trying to make them taste good regardless.  If you have a heritage from SW Virginia and Tennessee, you've no doubt heard of chocolate gravy.  Otherwise, probably not :)

It's like a warm, thick, chocolate pudding you serve over biscuits for breakfast.  You can either put the butter right into the whole pot of chocolate gravy right after it's cooked, or (like my mom) reserve the butter for serving time.  You pour the gravy over biscuits and then put a pat of butter on top and let it melt over the warm chocolatey goodness :)  Yummm

The picture above is not mine, but borrowed from google image search.  I plan to make this soon and will take my own pics then.  Ok....on with the recipe!

There are several variations of this floating around the web here and there, but my mom never followed a written recipe. She just threw it together and it always turned out great.  However, I followed my mom around the kitchen one day when she was making it and as she was about to put ingredients into the pot, I measured them and wrote them down and this is the result of that:


CHOCOLATE GRAVY


2 cups sugar
8 tablespoons flour (slightly heaped)
4 tablespoons cocoa (slightly heaped)
1 can evaporated milk
1/2 cup water (half the evaporated milk can)
1 teaspoon butter
butter or margarine to taste


Pour the milk into a pot and cook until heated (be careful not to burn it). Whisk the flour, sugar, and cocoa together into the milk and keep whisking as it cooks to avoid lumps.  Cook until thickened to a gravy-like consistency then add the vanilla.   

Pour chocolate gravy over your favorite biscuits and add a spoon or tab of butter on top and watch it melt over the chocolate.  You can pour the gravy over the biscuits or dip your biscuit into the gravy.  Either way it's terrific.  Adding the butter at the end makes the gravy shiny too. Eat it warm and chocolatey and buttery. Not so good for your waistline, but num!

It brings back fond memories of my mom cooking this for us for breakfast before school :)  Thanks mom!!

Wednesday, September 12, 2012

Today's Creativity

What's today's creativity? You're looking at it!  Wow is this blog creation stuff a head-scratcher :)  Do I have 3 columns or 2?  How do I adjust the image header height, where do I put this gadget or that gadget, how do I....how do I....Should I link to this thing or that thing?  Arghhhh :) LOL  Actually I'm enjoying the creativity part of it all, but you must know something. I'm a little anal. I'm self-taught at this :)  If I can't figure out how to do something, I'm scouring the web for a tutorial or explanation on this blog or that web site or what have you until I find the answer.  Fortunately I'm taking massive intense notes in Word and saving screen shots too. Hopefully if an issue comes up I've already dealt with, I can refer to my notes there :)  Onward and upward!

For my first template, I think it looked too congested and it didn't give me enough room for my regular posts to look right.  Now I have to re-align my side bar stuff. Ugh :)

My Blog Design (First Draft)

Tuesday, September 11, 2012

Never Forget!

9/11 - Remember the Heroes - "Greater love ha no one than this, that someone lay down his life for his friends." -John 15:13

Some of My Recent Craft Projects

As a way to start out my blog, I thought I would share some images of recent craft projects of mine. I've done a lot more than this, but these are the ones I have pictures handy of.

There really isn't any rhyme or reason for the crafty things I'm into. I love it all  :)  I enjoy wooden things, crochet, sewing, computer graphics, digital scrapbooking, paper scrapbooking, cards, oh I could go on and on :)

Everything but knitting. I've never learned how to knit. I find I always want to use the knitting needles like crochet hooks :)  I'm not giving up though! A good friend of mine knits and I may get the itch to talk her into teaching me how to knit before long :)

This Santa bowing down to baby Jesus is one of my favorites.  It's wooden yard art and about 36 inches tall:

Santa Bowing Down to Baby Jesus yard art Santa Bowing Down to Baby Jesus yard art  
When I make other ones, I won't put the holes around the edges as it just didn't look right when I put mini lights through the holes and lit it up.  That one is our own and it's got a spot light shone on it. I think that worked the best.  I cut it out of plywood after transferring the image I worked out in my graphics program to the wood.  It's secured into the ground with steel pipes. I've been wanting something like this for years and could never find it, so I figured it out myself and made it!


Connie the Cow and Friends Wood Cut-Outs

Connie the Cow and Friends Wood Cut-Outs

I used plywood left over from our yard art and corn hole game work to make these cut-outs of cartoon characters for my son for Christmas last year.  They were a big hit and he still loves them!  It's a TV show that used to be on called Connie the Cow and Friends.  Evan LOVES Connie and friends and you just can't find toys from that show, so I got this idea.  I already had the wood.  I just designed the graphics in my graphics program and transferred the image to the wood and cut it out with a jig saw.  I painted them with non-toxic paint (as my son is still into sticking things in his mouth) and then covered them with Mod Podge Hard coat (also non-toxic) to make them really hard so the wood wouldn't hurt him if he put them into his mouth (and to protect the wood from his teeth :)

I made bags to store them in:

Connie the Cow and Friends Wood Cut-Outs

There are around 62 in all and Evan loves them.  That was a LOT of work!  To see him love them so much was worth every minute though :)

Connie the Cow and Friends Wood Cut-Outs

Last Christmas I also made new salt dough ornaments for my Charlie Brown holiday tree:

Salt Dough Ornaments

Salt Dough Ornaments 

My husband and I started making corn hole sets to sell last year. He and I cut them with a table saw, sand them and construct them. I jigsaw the holes out and do all the paint work. I sew the corn bags as well.  Here are some images of the sets we've made so far:

Indians Corn Hole Game Set


This Ohio State set is ours and it got scratched. I need to touch it up.  I got an Associate of Arts degree (2 year degree working towards a Bachelor's degree I never got to finish due to suffering a mild stroke) from OSU before I met my husband, so I'm a Buckeye alumni and fan :)

 OSU Corn Hole Game Set

We just did this one a few months ago for a friend of his who is a veteran:

Marines Corn Hole Game Set

Youngstown State Penguins for my friend Joanne:

Youngstown State Corn Hole Game Set

and the Browns for my son's bus driver aid:

Browns Corn Hole Game Set

I made this Christmas Advent calendar last year. I've never had one... ever!  It looks crooked in the picture, but it's the angle of the camera :)  I learned how to print onto fabric (thank you, Pinterest!) and printed the images at the top of it onto muslin from pics of the nativity I found online.  There is a tiny stocking for every day of the season that hangs to the calendar by a little button so you can adjust it for every year. There are little cards with activities, scriptures, etc. on them and we put one of each in the little stockings for an activity to do that day.  Once the card is used, I put it in a little pocket in the lower right hand side that also hangs by buttons (it says Thank You Jesus on it)

Christmas Advent Calendar

More wooden yard art for my friend Joanne (each one is about 40 inches high if I remember right):

Christmas Tree Yard Art

Easter basket and more eggs to scatter around it
Easter Egg Yard ArtEaster Basket Yard Art


Currently I'm teaching myself how to crochet rag rugs from bed sheets.  This is my first effort. It was going pretty well till I noticed a tear drop shape forming. Ugh.  I need to take it apart and re-do it.  I want to try one using a crochet doily pattern next to make one a lot prettier!


That's it for this post :) Thanks for looking!


My First Tutorial - Circular Granny Flower

   I've had this pattern for over 20 years and recently when gathering all my crafting supplies and whatnot to organize into the room in our basement I converted from a guest bedroom into a craft room (more about that in another post), I came upon my crochet patterns from way back then.  A few weeks ago I started crocheting a baby afghan using the pattern and since (after a search online) I couldn't find it on the internet to share with a friend, I decided to take pictures of the process and use it to make my first tutorial for my blog.
   Keep in mind this is my very first tutorial, so bear with me as I stumble my way through :)

This is what I have done so far on this particular afghan. (It's straight, I promise. It looks crooked because it isn't finished yet so it's laying kind of crooked when I took the picture. Also the purple is a really soft purple, not as dark as it looks in this picture.
Circular Granny Flower Baby Afghan

Here's a picture of a baby afghan I made for a friend way back in 1983 or so.  There were no digital cameras back then so this was taken with a simple old instamatic camera (I'm showing my age lol):
Circular Granny Flower Baby Afghan

   So as you can see, there are several different ways you can arrange the flower-ettes in your design.  In that afghan, I put a silky fabric backing on it. I plan to put a white fleece backing on the one I'm working on right now.

Here's a close up:

Circular Granny Flower Baby Afghan

and a side view:

Circular Granny Flower Baby Afghan


Ok, here we go :)

With the color you want the petals to be, crochet 5 chain stitches and then slip stitch into the first chain to form a circle.  Then do 5 more chain stitches:

Circular Granny Flower Tutorial - Shades of Safhire - shadesofsafhire.blogspot.com

The next 3 stitches will be triple crochet to form 4 stitches in all (the very first one being the 5 chains in the first petal)


Circular Granny Flower Tutorial - Shades of Safhire - shadesofsafhire.blogspot.com

Circular Granny Flower Tutorial - Shades of Safhire - shadesofsafhire.blogspot.com

So at this point you should have four stitches into the circle:

Circular Granny Flower Tutorial - Shades of Safhire - shadesofsafhire.blogspot.com

Take the crochet hook out of the last stitch you worked and put it into the top of the very first stitch (which is the 5 stitches after the circle you crocheted).

Circular Granny Flower Tutorial - Shades of Safhire - shadesofsafhire.blogspot.com

Then hook back into the loop you left again forming a slip stitch and pull it tight so the petal curls

Circular Granny Flower Tutorial - Shades of Safhire - shadesofsafhire.blogspot.com

chain stitch 2 and then triple crochet into the circle again.  Do this 3 more times for a total of 4 stitches to form the second petal:

Circular Granny Flower Tutorial - Shades of Safhire - shadesofsafhire.blogspot.com

Continue the same to make a total of 4 petals.
Crochet 2 chain stitches:

Circular Granny Flower Tutorial - Shades of Safhire - shadesofsafhire.blogspot.com

Slip stitch into the top of the first petal and pull tightly and cast off.  You'll then be ready for the second color:

Circular Granny Flower Tutorial - Shades of Safhire - shadesofsafhire.blogspot.com

With the second color, double crochet into the 2 chain stitches between the petals.  Then chain one.  
Do this 3 times for a total of 3 stitches

Circular Granny Flower Tutorial - Shades of Safhire - shadesofsafhire.blogspot.com

Chain one and repeat the process into the next chain 2 stitch of white so you have another section of 3 stitches.  Do this again till you have 4 sections of 3 double crochets between the petals:

Circular Granny Flower Tutorial - Shades of Safhire - shadesofsafhire.blogspot.com

Circular Granny Flower Tutorial - Shades of Safhire - shadesofsafhire.blogspot.com

Circular Granny Flower Tutorial - Shades of Safhire - shadesofsafhire.blogspot.com

When all four sides have their respective 3-double crochets, slip stitch into the first double crochet of that round.  Then crochet 5 chain stitches like this:

Circular Granny Flower Tutorial - Shades of Safhire - shadesofsafhire.blogspot.com

After the 5 chain stitches, triple crochet into the next stitch:

Circular Granny Flower Tutorial - Shades of Safhire - shadesofsafhire.blogspot.com

Continue the triple crochet, chain one pattern all the way around till you slip stitch into the first stitch of that round:

Circular Granny Flower Tutorial - Shades of Safhire - shadesofsafhire.blogspot.com

Chain 2 and double crochet into the first triple crochet stitch.

Circular Granny Flower Tutorial - Shades of Safhire - shadesofsafhire.blogspot.com


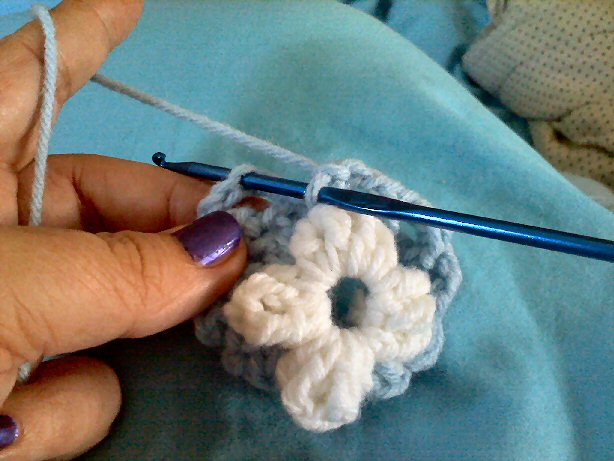
Double crochet into each stitch in that round (no chain in between the double crochets like you did in the first round - just double crochet all the way around).  Crochet this round tightly as this round is what forms the 3-dimensional effect
Circular Granny Flower Tutorial - Shades of Safhire - shadesofsafhire.blogspot.com

When you finished this, the back of the flower-ette will look like this (a hollow arrow in the middle of the flower-ette):

Circular Granny Flower Tutorial - Shades of Safhire - shadesofsafhire.blogspot.com

The front will look like this when you're finished:

Circular Granny Flower Tutorial - Shades of Safhire - shadesofsafhire.blogspot.com

Circular Granny Flower Tutorial - Shades of Safhire - shadesofsafhire.blogspot.com

That's it for the flower-ette!  Then just make as many of these as you need for the afghan in as many colors as you decide you want your pattern to be.  Then join the flower-ettes together with yarn and a yarn needle in the layout of your choice. This will be a very warm afghan for any little one since it's really two-layers as you are left with a puff-effect.


When you have it all done, you can crochet a border around the edges in whatever edging you decide.  For the one I made 20-some years ago, I did it like this.  I used yarn and a yarn needle to stitch the baby's name and birth information onto the borders too.  :


I put a backing on this because the back looks like this and I didn't want a baby to get his little toes or fingers in the open places on the back:

Circular Granny Flower Tutorial - Shades of Safhire - shadesofsafhire.blogspot.com


You can line the flower-ettes up in squares, or straight lines or any number of combinations.  Just use your imagination and be creative!

You can line them up without big spaces between the flower-ettes:

Circular Granny Flower Tutorial - Shades of Safhire - shadesofsafhire.blogspot.com

Or like I did my old one leaving big spaces between:


I hope I made sense in this -my first tutorial :)  If you have any questions or input, just leave a comment!  
Happy crocheting!


LinkWithin

Related Posts Plugin for WordPress, Blogger...
Find us on Google+